Webroots 2: Cloud Streaming


Now that we've got all our wireless programming tools set up, we will begin to interface with the Night Light directly. Say I want a different color? Fiddling with the RGB values is fun up to a certain point. This tutorial will teach you how to set up a service in the Adafruit IO to change the light from your phone.
We will utilise the Adafruit IO since it is very easy to set up and use.
- Register for an Adafruit account
- Sign in for the Adafruit IO Beta
- Install the Adafruit MQTT library & Adafruit IO Library
- Install the AdruinoHttpClient library
Dashboard Setup
Adafruit's information interfaces is separated into Dashboards. All the information you ever want for a project is stored in a Dashboard. It is similar to Workspaces in MacOS or in Windows. Within each workspace, information is displayed in Streams. Your application provides data to a channel or Stream and it is then displayed in the widget.
Setting up a Dashboard is simple. Navigate to Dashboards in Adafruit IO and under actions, Create a New Dashboard. You can name this dashboard "Night Light". Clicking on it will lead you to the next screen.
Block Setup
The screen will be black with a few symbols. You populate your dashboard with dials and controls and displays to represent your project. Click on the blue + and select the Color Picker. In the next screen, create a new feed named "Nightlight_color". Select the feed by clicking the checkbox next to the name and proceed on to the next step.

Figure 1. Selecting Feed
Click on Create block in the next screen.

Figure 2. Block created
Now this block will publish information to the 'Nightlight_color' stream. We will program the night light to listen to this stream. It will then pick up on any changes in the stream and hopefully, change color!
Arduino Setup
You will need an API key. This key uniquely identifies you to the Adafruit servers so that they know what content to serve you. In Adafruit IO, go to Settings > View AIO Key. Take note of the Active Key as that is what you will need to supply to your code in Arduino later.
You will also need to install the Adafruit IO library.
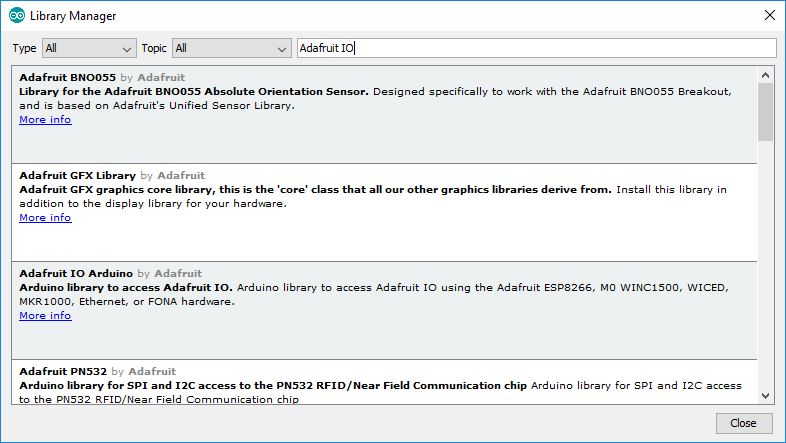
Figure 3. Adafruit IO library
Under Files > Examples > Adafruit IO Arduino > adafruitio_14_neopixel
As per earlier projects, we will only be extracting useful code. Under config.h you will see the following code. These can be added to the start of your project:
#define IO_USERNAME    "your_username" //Your Adafruit username
#define IO_KEY         "your_key" //AIO key from earlier
#define WIFI_SSID       "your_ssid"
#define WIFI_PASS       "your_pass"

#include "AdafruitIO_WiFi.h"

AdafruitIO_WiFi io(IO_USERNAME, IO_KEY, WIFI_SSID, WIFI_PASS); // create Adafruit io object.
Under adafruitio_14_neopixel you will see the following code, extract them into your own project. We will set up the RGB LEDs as follows
#include "Adafruit_NeoPixel.h"

#define PIXEL_PIN     D6 // pin we are connected
#define PIXEL_COUNT   12
#define PIXEL_TYPE    NEO_GRB + NEO_KHZ800

Adafruit_NeoPixel pixels = Adafruit_NeoPixel(PIXEL_COUNT, PIXEL_PIN, PIXEL_TYPE);
And we set up the WeMos to listen to the feed that we have prepared in Adafruit IO earlier:
AdafruitIO_Feed *color = io.feed("Nightlight_color");
Under setup:
Serial.begin(115200); // begin serial communications for debugging

io.connect(); // This is a method under AdafruitWifi.h that helps to set up the wireless connection and contacts the IO server.

color->onMessage(handleMessage); // we will need to handle messages on the "Nightlight_color" stream that we have set up earlier

while(io.status() < AIO_CONNECTED) {
  Serial.print(".");
  delay(500);
}
Serial.println();
Serial.println(io.statusText());

pixels.begin(); //remember to initialise the RGB LEDs.
pixels.show();
Under loop:
io.run();
This is an asynchronous function that does not block processing like what delay does. It will be called periodically by an internal timer that is set up and contact the Adafruit servers, asking if there was any change in the data. If there is a change, it will then check what streams we have set up to watch for, and trigger it via an interrupt.
These functions look different from the interrupts that we have learnt earlier because Adafruit has simplified the interface. However, the characteristics of interrupts still remain: no return values, and no modifying of non-volatile values.
We also have to include another function that we called earlier. The handleMessage function. It essentially processes the incoming data that is a hexadecimal value that is used to represent colors. However the pixels.setPixelColor function does not understand this, and so Adafruit has kindly written a function that converts hexdecimal to decimal, which we can then put into the pixels.setPixelColor function:
void handleMessage(AdafruitIO_Data *data) { //New AdafruitIO_Data object!

  // print RGB values and hex value
  Serial.println("Received HEX: ");
  Serial.println(data->value()); // displays data as hex

  long color = data->toNeoPixel(); // converts hex to a value the neopixel can use!

  for(int i=0; i<PIXEL_COUNT; ++i) {
    pixels.setPixelColor(i, color); // sets the color.
  }
  pixels.show();

}
Note that you cannot use functions such as value() or toNeoPixel() anywhere else as they are functions that belong to the AdafruitIO_Data object. This is like saying that the multiply * function belongs to the int object. Applying it to a string or char object will not make sense. Objects are how things are defined. It is a certain kind of 'thing' that is different from the others, even if in name.
Sketch
The code is available on GitHub.
#include <Adafruit_NeoPixel.h>
#define NUMPIXELS 1 // change if you have more pixels
#define PIN D6 // config for ESP8266
#define INPUT_PIN A0 // config for ESP8266
#define BRIGHTNESS ... //set this as the threshold value for darkness

#define IO_USERNAME    "your_username" //Your Adafruit username
#define IO_KEY         "your_key" //AIO key from earlier
#define WIFI_SSID       "your_ssid"
#define WIFI_PASS       "your_pass"

#include "AdafruitIO_WiFi.h"

AdafruitIO_WiFi io(IO_USERNAME, IO_KEY, WIFI_SSID, WIFI_PASS); // create Adafruit io object.

AdafruitIO_Feed *color = io.feed("Nightlight_color");

// Set the volatile keyword if you want to retain the RGB values

int volatile r = 0;
int volatile g = 0;
int volatile b = 0;
int input_value = 0;

Adafruit_NeoPixel pixels = Adafruit_NeoPixel(NUMPIXELS, PIN, NEO_GRB + NEO_KHZ800);

// setup and loop functions

void setup() {
  Serial.begin(115200); // begin serial communications for debugging

  io.connect(); // This is a method under AdafruitWifi.h that helps to set up the wireless connection and contacts the IO server.

  color->onMessage(handleMessage); //we will need to handle messages on the "Nightlight_color" stream that we have set up earlier

  while(io.status() < AIO_CONNECTED) {
    Serial.print(".");
    delay(500);
  }
  Serial.println();
  Serial.println(io.statusText());


  // Init RGB led

  pixels.begin();
  pixels.show();

  pinMode(INPUT_PIN, INPUT);

  r=100; // set RGB values, moving them out of turn_on()
  g=30;
  b=70;
}

void loop() {
  // put your main code here, to run repeatedly:
  io.run();
  input_value = analogRead(INPUT_PIN);
  if (input_value < BRIGHTNESS) {
    turn_on();
  }
  if (input_value > BRIGHTNESS) {
    turn_off();
  }
  delay(100);
}


// Functions we wrote

void turn_on(){

  for(int i=0; i <NUMPIXELS;i++){
    pixels.setPixelColor(i,pixels.Color(r,g,b));
  }
  pixels.show();
}

void turn_off(){
  for(int i=0; i<NUMPIXELS;i++){
    pixels.setPixelColor(i,pixels.Color(0,0,0)); // set the color to (0,0,0), off!
  }
  pixels.show();
}

// New functions

void handleMessage(AdafruitIO_Data *data) { //New AdafruitIO_Data object!

  // print RGB values and hex value
  Serial.println("Received HEX: ");
  Serial.println(data->value()); // displays data as hex

  //Calls hex2dec function and updates global volatile rgb values.
  hex2dec(data->value());

  long color = data->toNeoPixel(); // converts hex to a value the neopixel can use!

  for(int i=0; i<NUMPIXELS; ++i) {
    pixels.setPixelColor(i, color); // sets the color.
  }
  pixels.show();

}

void hex2dec(string hexstring){
  int number = strtol( &hexstring[1], NULL, 16);

  // Split them up into r, g, b values
  r = number >> 16;
  g = number >> 8 & 0xFF;
  b = number & 0xFF;
}