Thunderboard BG22 ⚡
Is the BG22 best platform for learning Bluetooth Low Energy? With excellent documentation, a great IDE experience, and a low price, I definitely think so!


Introducing the Thunderboard BG22 from Silicon Labs! Featuring the all new EFR32BG22 Bluetooth 5.2 IC and a whole bevy of sensors, it is the perfect platform for learning BLE and microcontrollers.
If you are interested in taking a step beyond Arduino and want a platform that loves its developers with quality documentation and a smooth development workflow regardless of your OS preferences, then I recommend getting the BG22 to test out.
Tldr; what I love about this board: great documentation, smooth development workflow, many sensors, small size, and low price.
BG22 Workshops by Silabs
What can be better than workshops by the very people who make the kit? Get started with the Thunderboard BG22 and Simplicity Studio 5 by following along the Bluetooth Workshop Series.
I personally found the cryptography and the OTA part of the workshop to be very helpful.
Wireless Plant Monitoring Sensor
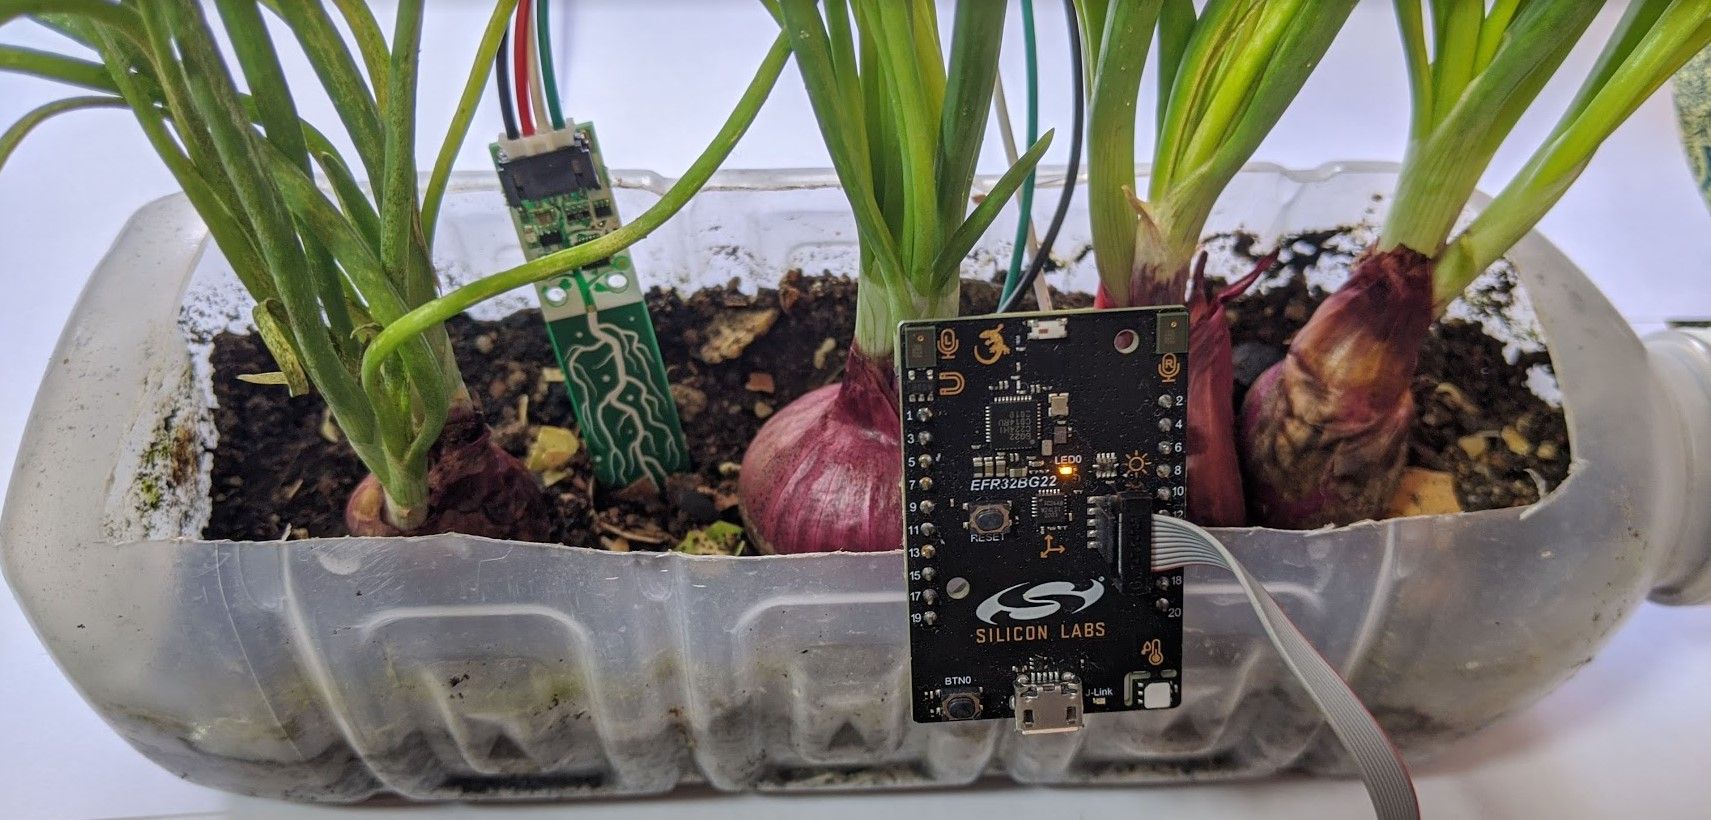
In this project I combine the BG22 and a soil sensor, exploring I$^2$C, power draw requirements, and writing a Flutter app.
TinyML on the Edge
In this project I use a BG22 to do some anormaly detection using the onboard accelerometer and Tensorflow Lite.
Introducing the Thunderboard
The Thunderboard is a diminutive 3 cm (1.2 in) x 4.5 cm (1.75 in) board with full J-Link debugging capabilities. It hosts the EFR32BG22 SoC, a Bluetooth 5.2 capable IC with an on-board ceramic antenna. It also has a thermometer/humidity sensor, 6-axis IMU, a hall effect sensor, battery level sensor, and luminosity/UV index sensor. That is a lot of sensors!
| Sensor | IC Number | Link |
|---|---|---|
| Luminosity/UV | Si1133 | Silicon Labs |
| 6-axis IMU | ICM-20648 | Invensense |
| Thermometer/Humidity | Si7021 | Silicon Labs |
| Hall Effect Sensor | Si7210 | Silicon Labs |
Apart from that, it is a gorgeous dev kit, as you would expect from Silicon Labs. At $22 USD, while it not the cheapest BLE 5.0 dev kit, it is still one of the most fully featured. Update (6 September 2021): They released a new version which fixes the microphone bug!
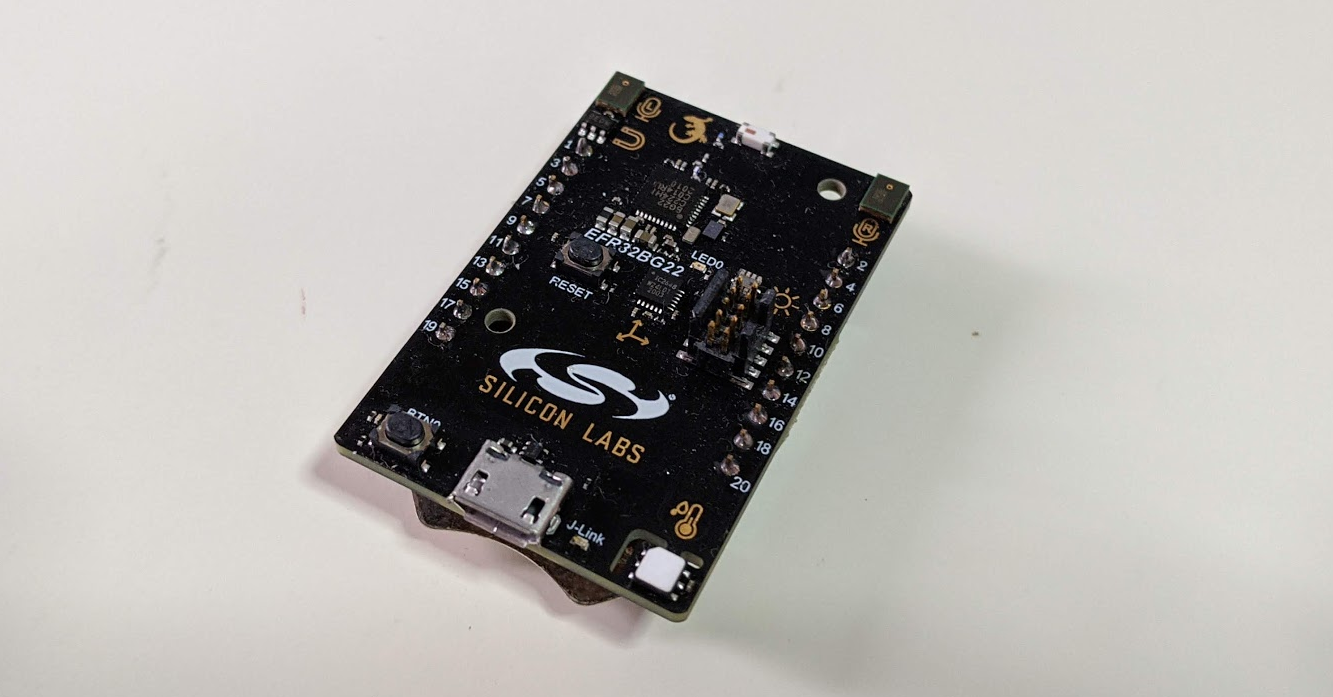
The board also breaks out pins which you can use to join up additional sensors (the pins will sit nicely in a breadboard, but it will not allow you to plug in any wires because the board is too wide). It also breaks out a programming header that you can use to connect a J-Link On Board Debugger from any Silicon Labs Starter Kit, which automatically nets you VCOM output, C2 debug, and a custom energy monitor which you can use to measure the current draw of your design in real time down to 10nA.
To test out battery powered applications there is a CR2032 coin cell battery holder to power the board with, and it intelligently switches between USB and battery based on what is connected at the moment.
Please note that the microphones are not active in this board iteration because their signal traces are too close to the Bluetooth signal traces; this causes coupling and leads to a degradation in the Bluetooth signal.
Don't remove the white tape on top of the the temperature sensor! That is a filter that prevents particulates from entering the sensor.
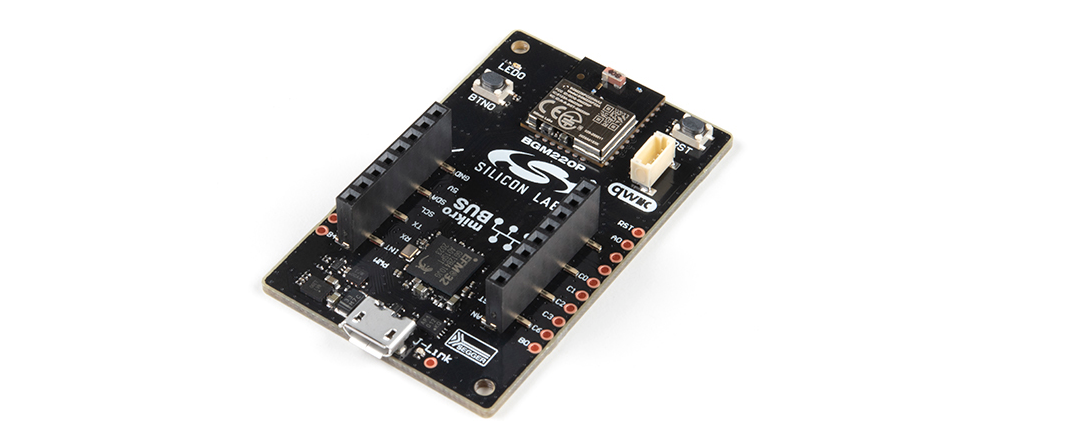
There are also modules for the IC available too!

I like working with modules because they abstract away all the really fiddly bits of signal routing, especially when it comes to radio signals. They also help to compress designs by quite a fair bit. Case in point: unless I am having boards assembled, I usually use 0402 and 0603 components, which take up more space if I had designed all the supporting circuitry than if I used one of these modules. Plus at \$7 , they are a steal for not having to do all the hard work yourself.
If you are interested in exploring these modules with the ability to add on other boards, Silicon Labs also has modified their standard Thunderboard with into the BG22 Explorer Kit which is an insane \$10. It comes with a MikroBus Socket, and a Sparkfun Qwiic socket for adding peripherals quickly.
Simplicity Studio 5
Simplicity Studio 5 is a souped up version of the last generation of Simplicity Studio 4. It carries over lots of the features that I really liked: a zippy Eclipse-based editor, integrated documentation, and tight integration with Silcon Labs products, especially the starter kits.
There are some visual refinements, switching from the native interface to a more web-like interface. I have a pretty good guess that it is running Chromium under the hood, which is kind of a beefy framework to run an interface.
The Eclipse interface is heavily tailored to include only the parts relevant to embedded development. I really appreciate this since there is less visual clutter. Since it is Eclipse-based, you are also free to further customize the IDE to your liking.
Tight integration between code and device makes programming and debugging a breeze. It recognizes what device you plugged in, and brings up the relevant examples/SDK.
Launcher
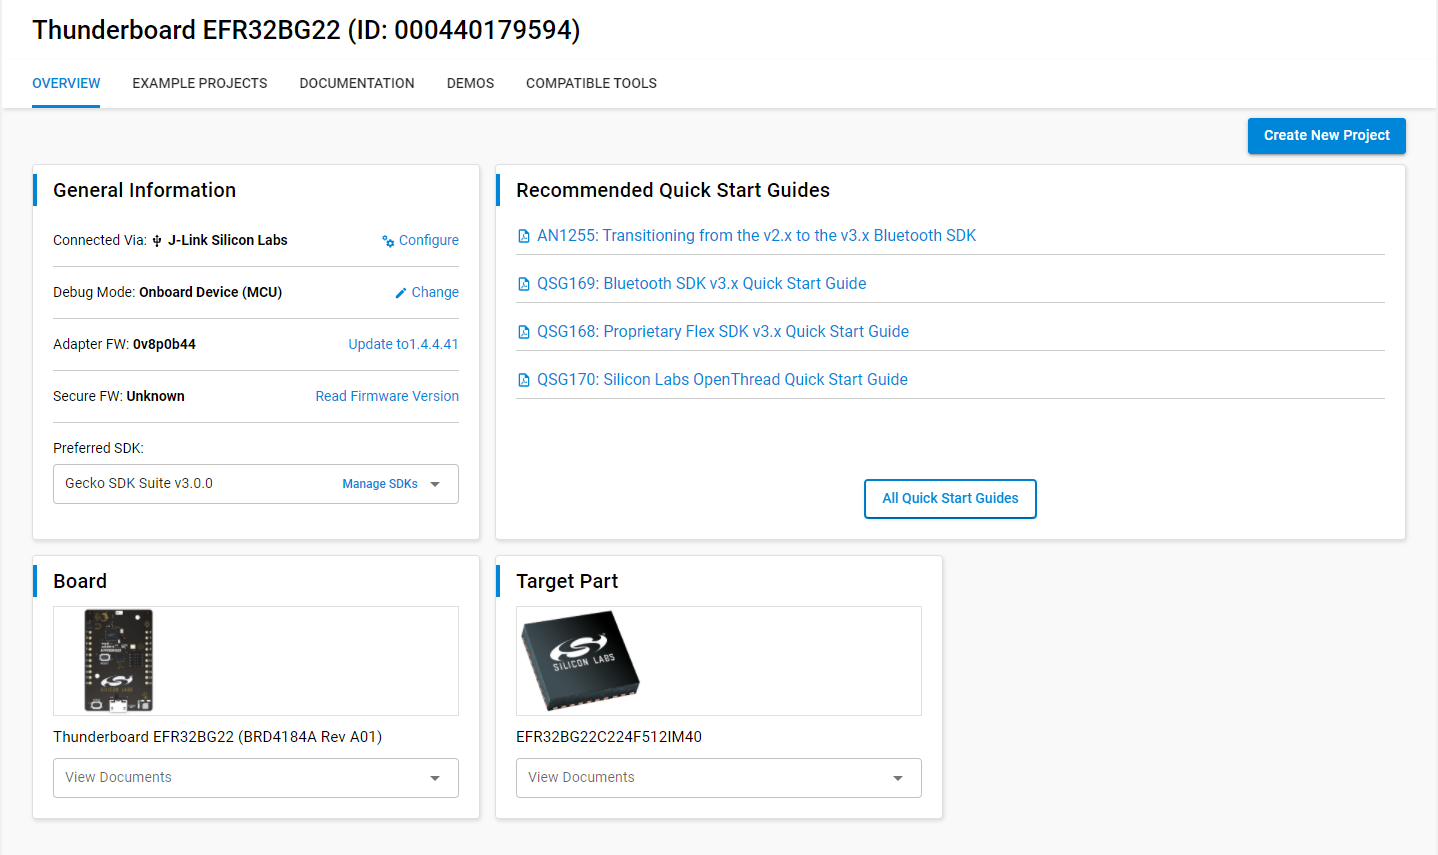
The launcher is where you start all your projects. It consolidates all the relevant documentation, examples, demos, and tools for the device all in one convenient space.
Software Wizard
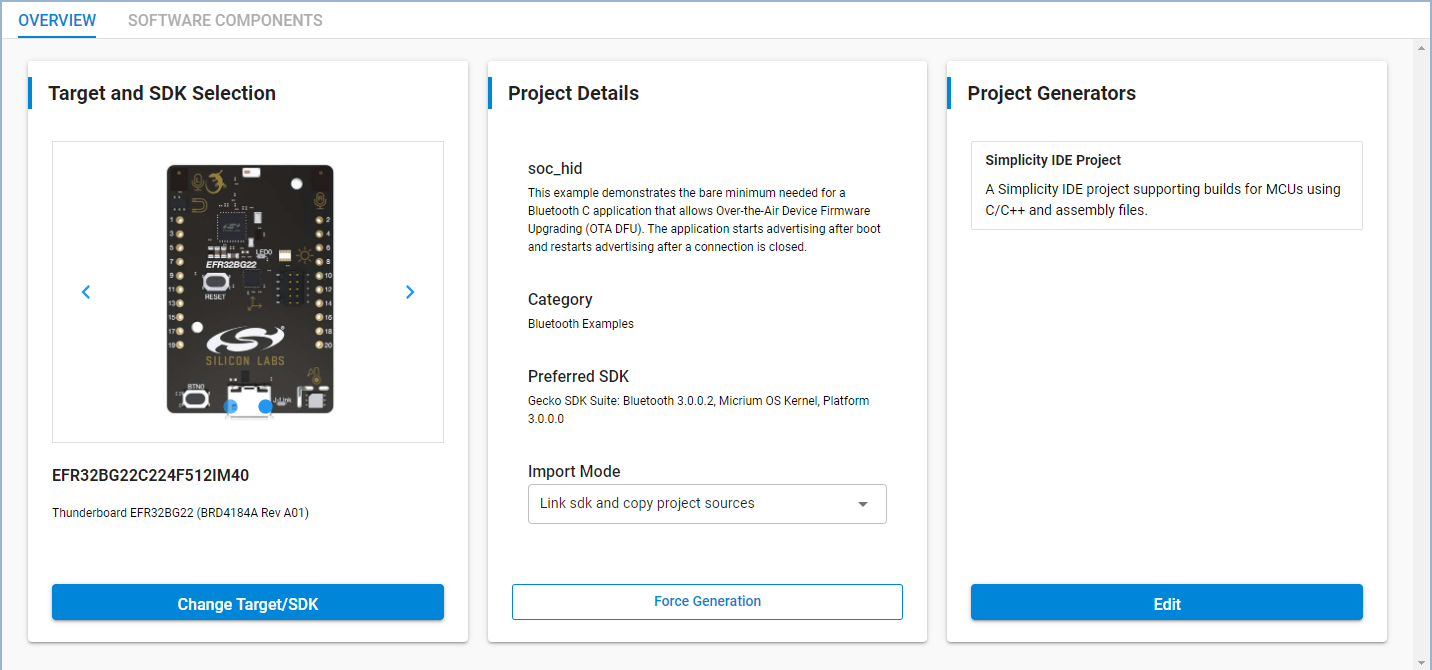
The software wizard is probably my favourite tool. It hosts the software components tab, which is a quick and easy way to import modules from the HAL as needed, and if you keep to the suggested structure of the code, it even does the initialization for you.
Pintool
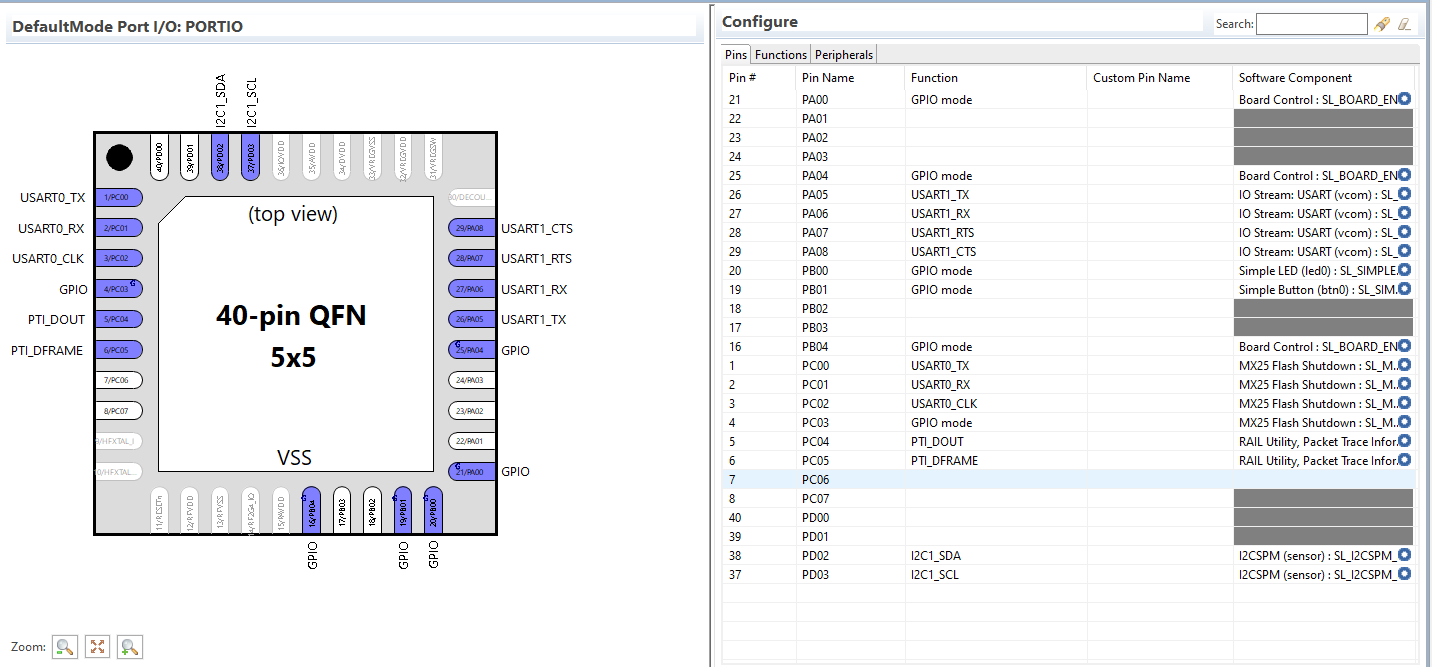
The pintool is used to define the functions of the pins graphically, and it automatically deconflicts any functions that use shared pins.
Advanced Energy Monitoring
AEM allows you to measure the power usage of an external device from 100mA down to nA.
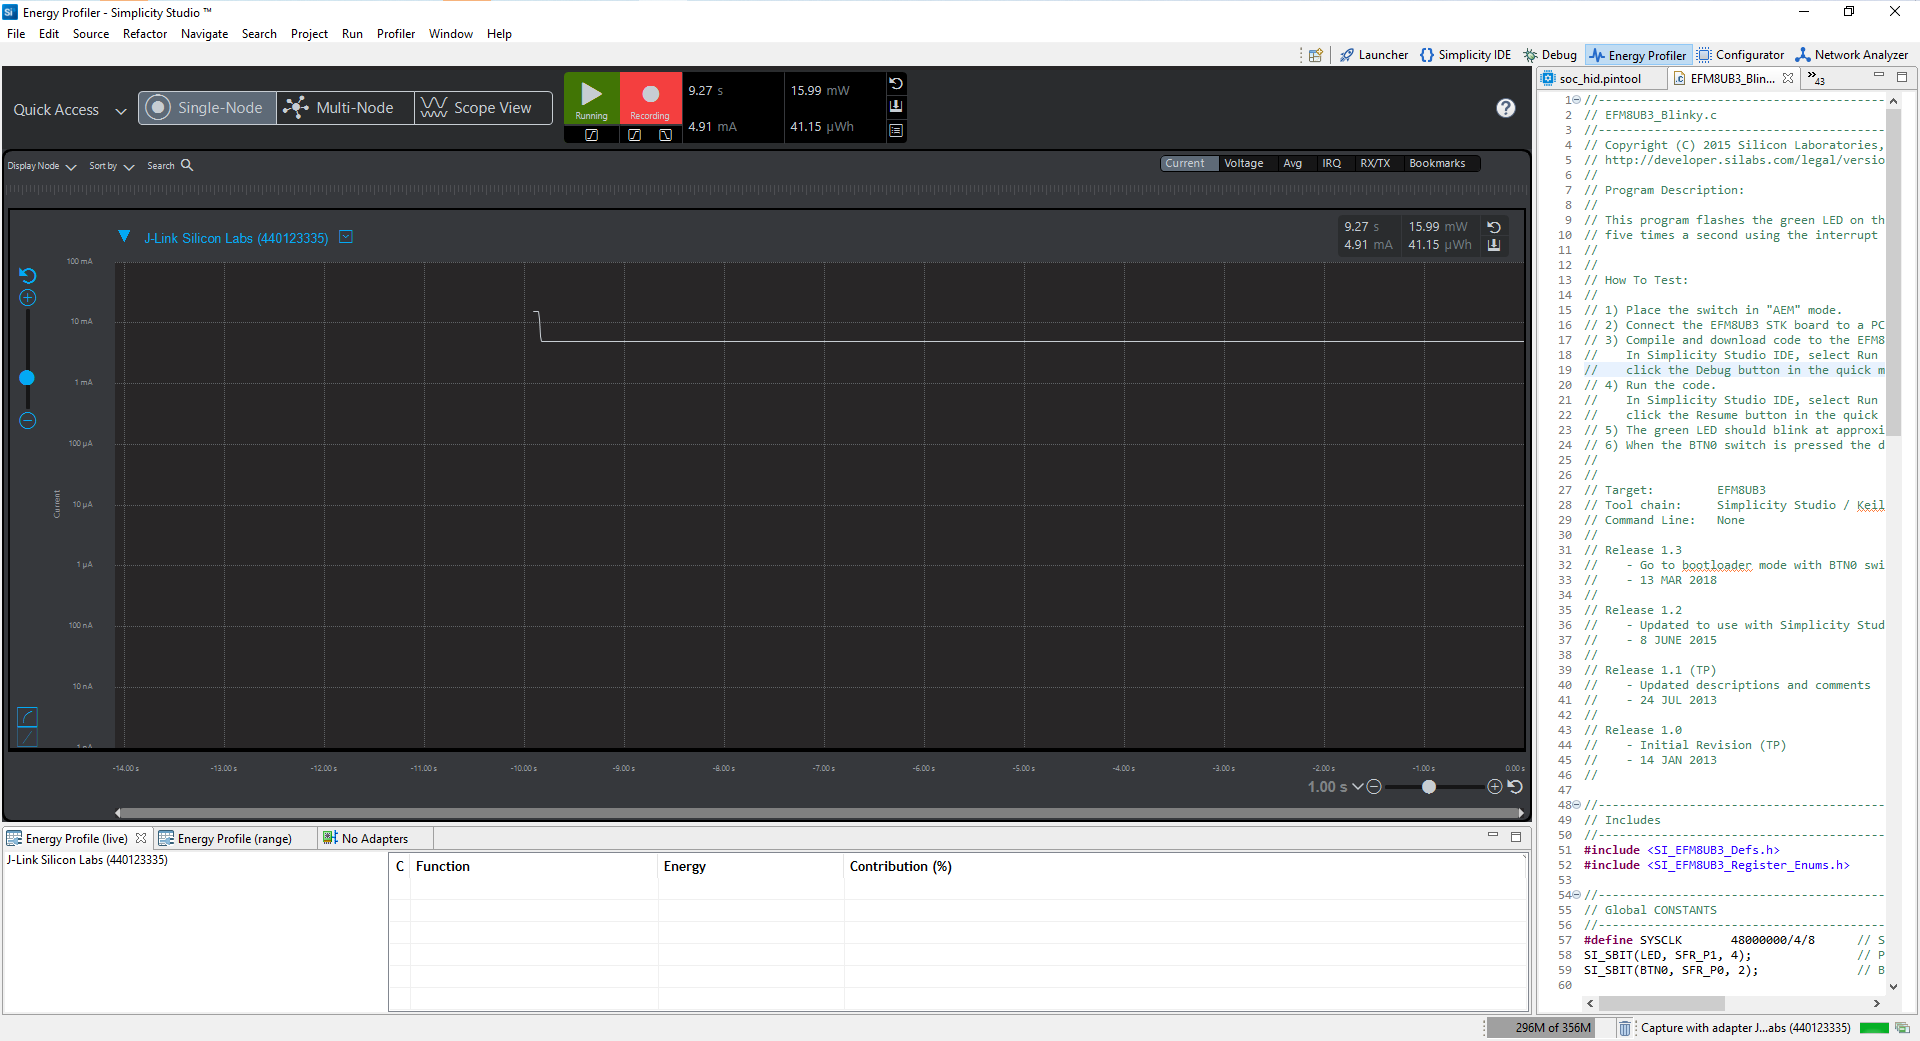
This is incredibly useful for measuring power consumption for battery powered applications.
Bluetooth GATT Configurator
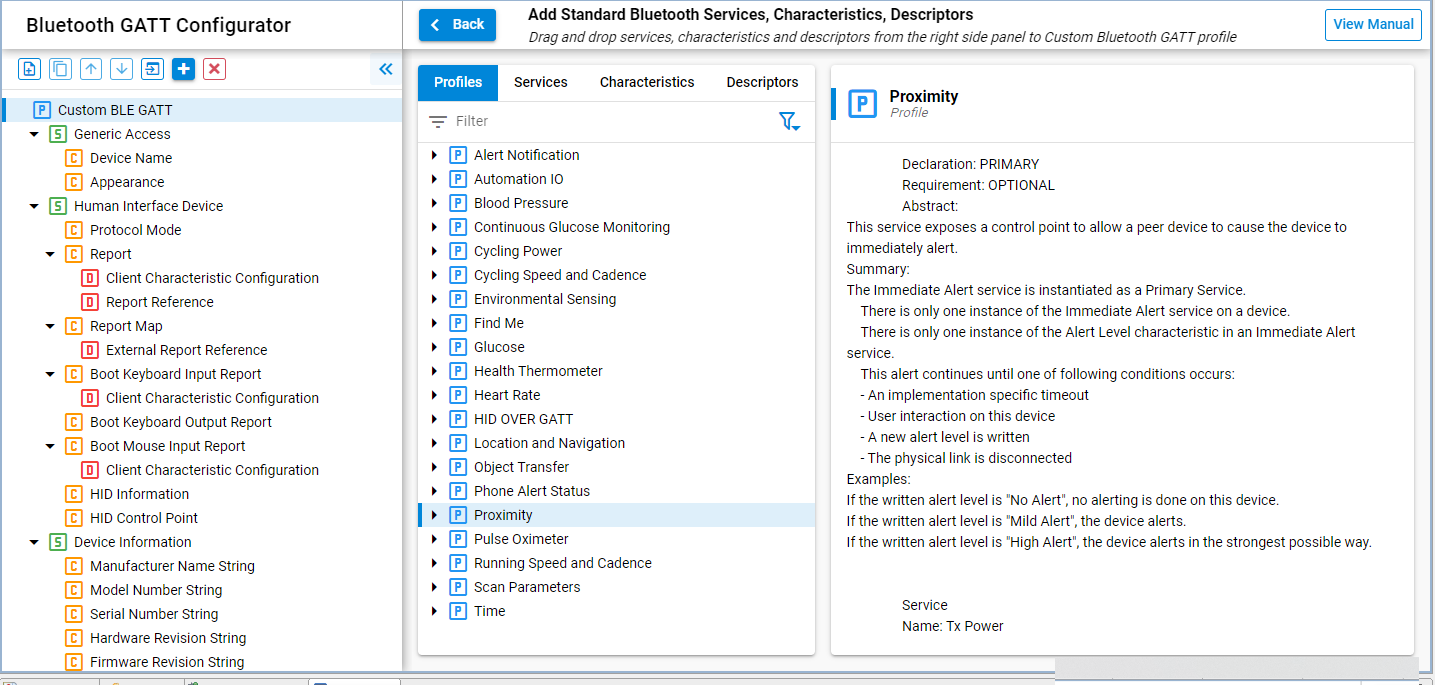
Simplicity Studio 5 ships with the easy-to-use Bluetooth GATT Configurator that makes setting up Bluetooth GATT profiles a breeze. It can be found under Software Components > Advanced Tools.
Bluetooth GATT
GATT stands for the Generic Attribute Profile, which defines how BLE devices talk to each other. It can be basically described as a big list of attributes with read/write fields that either update periodically or remain static. To transfer data, devices read and write to these attibutes.
Characteristics
Characteristics are the atomic parts of the GATT. They typically include a field that is either read or written to and a few parameters to determine how the field is to be treated. For example if the field is tagged with a Read parameter, it means that the field can be read, but not written to.
Descriptor
Descriptors add additional information about the Characteristic, however they are not necessary.
Services
Services are made up of several Characteristics. For the service to mean anything, it needs to have Characteristics. It usually provides a set of related information about the device, i.e. the Device Information Service includes the Manufacturer Name String Characteristic, Model Number String Characteristic... etc
Profiles
Profiles are formed from several services. They are typically provided as part of the standard Bluetooth specification to serve common needs, like the Heart Rate Profile, or the Location and Navigation Profile, and include all the mandatory Services and Characteristics. While it is possible to create your own copy of the official Profile using the same set of Services and Characteristics, however, it is more prudent to modify an existing Profile for your needs.
Programming & Usage Guide
This guide is mainly geared towards those who are relatively new to development boards and embedded programming in general. However, some knowledge of communication protocols like I$^2$C, SPI, and GPIO, and timers.
The board already has some code preloaded so you can immediately start exploring the board. However, the best way is to download the latest code from Silicon Labs via Simplicity Studio 5 and upload the soc_thunderboard example project to the board.
This guide aims to walk you through the structure of how Silabs scaffolds their project, providing you with the tools to start writing your own.
References
- Silicon Labs Gecko SDK reference - Useful reference for peripheral functions
Useful tips
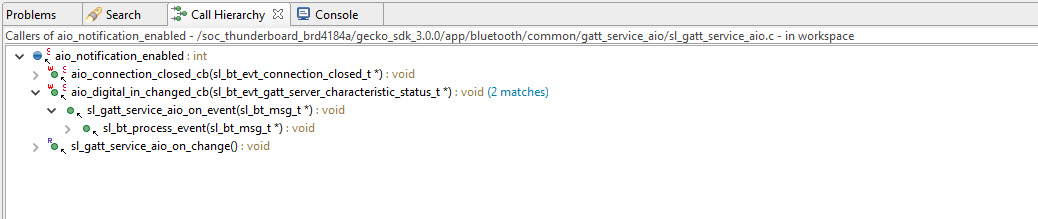
Open DeclarationandOpen Call Hierarchyare two context menu options that I found most useful when I was exploring the code.Open Declarationwill bring you to where the function is defined. Hovering over the function will also show a snippet of the function. This is useful if you want to find out how a particular piece of code works.Open Call Hierarchyopens a tree of functions that call the function that you are interested in, so that you can understand how and where it fits into the code. These two functions essentially allow you to crawl up and down the tree of dependencies and functions.
2. Debug messages are printed out over the COM port through the VCOM debug interface of the debugger. For Windows users, check under Device Manager of which COM port the board belongs to. I use Termite as a lightweight serial port manager to read debug messages. In the code, sl_app_log() is used to print debug messages.
The code starts in app.c, and it is best to write your code here to keep it portable across the autogeneration tools.
Guiding questions
Starting in app.c, answer the following questions:
- Long does the board advertise for? How can you change this?
- What is the advertising period?
- How does the board detect what kind of power is connected?
Hello World Project
Start a new empty soc project with the thunderboard template. Use all the default options and name the project however you want. Once Silabs has completed setting up the project, you should see it appear in the Project Explorer.
.slcp
This the main configuration tool for your project. Silicon Labs provides drivers as installable modules that intelligently configures and initializes objects. I would say that using this API provides an even higher level of abstraction than having a HAL, and there are more autogenerated files. But what you get is a simple and unified interface to quickly interact with I$^2$C sensors, buttons, and LEDs. Under Software Components > Platform > Driver install Simple Button and Simple LED.
In order to debug and print messages, we also need a UART stream. Under Software Components > Services > IO Stream install IO Stream: UART. Under Software Components > Bluetooth > Utility install Log to get the logging functionality. From here, the app log is automatically bound to the UART port and no additional configuration is required.
| Software Components | Module | Reason |
|---|---|---|
| Simple Button | Platform > Driver | To control btn0 |
| Simple LED | Platform > Driver | To control led0 |
| IO Stream: UART | Services > IO Stream | To print debug messages |
| Log | Bluetooth > Utility | To print debug messages |
Side note: the great thing about using these modules is that lots of quality of life features have already been thought out and implemented. For the Simple Button, it not only incorporates debouncing, but toggling between active-high and active-low button is as simple as changing a value in the Simple Button Core in the Configuration Wizard.

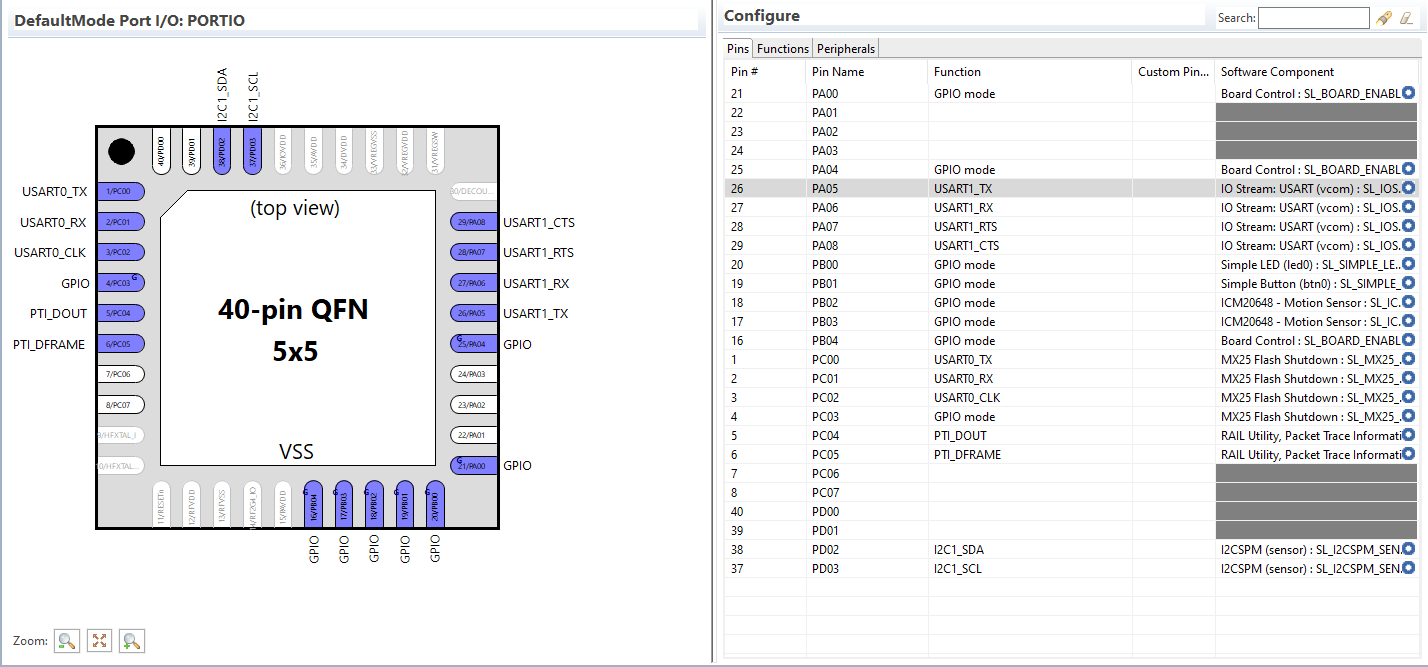
.pintool
This is the file that retains all the pin configuration details. Once you have defined the modules that you are going to use in the Configuration Wizard, it can automatically configure the pins for you. Under Configure > Peripherals, bind USART1 to IO Stream (vcom).
Since buttons and leds are general GPIO pins, under Configure > Pins, map PB0 > Simple LED (led0) and PB01 > Simple Button (btn0).
Hello World - Buttons and LED
Your application code lives in app.c, and you can see the autogenerated code under the autogen folder.
To use the LED and Button APIs:
#include "sl_app_log.h"
#include "sl_simple_button_instances.h"
#include "sl_simple_led_instances.h"
SL_WEAK void app_init(void)
{
sl_app_log("APP initialised\n");
// Note: Not really necessary because they are already initialized in main.c
sl_simple_button_init_instances();
sl_simple_led_init_instances();
}The nice thing is that initializing button and led instances are actually not necessary because of the autogeneration, this is also taken care for you in main.c.
SL_WEAK void app_process_action(void)
{
  sl_simple_button_poll_instances();
  sl_button_state_t button_state = sl_button_get_state(&sl_button_btn0);
  if (button_state == SL_SIMPLE_BUTTON_PRESSED) {
      sl_app_log("Button is pressed!\n");
      sl_led_toggle(&sl_led_led0);
  }
}
The SL_WEAK macro indicates that this is a weak implementation that can be overwritten by another function of the same name. Here the button instances are polled to update the state of the button, which is then used to update both the debug log as well as the LED.
Here, when you press the button, the LED will toggle very rapidly, which causes it to appear at 50% brightness.
Questions
- How can you display a normal blinking LED with the USTIMER peripheral?
Bluetooth Keyboard Project
Bluetooth HID over GATT
Being able to emulate and send keystrokes over bluetooth is a very useful feature. Because keyboards and input devices are a very well known peripheral devices, it is easy to pair them to devices and just have these devices respond to keyboard input events instead of designing your own unique Bluetooth protocol.
Security
Bluetooth HID requires an encrypted link, so once it is paired, it is necessary to upgrade the link. Several characteristics would also need to require encryption before they can be read by the device.
GATT characteristics
Feel free to skip over this part, but I thought it would be useful to understand how to set up the GATT database for a HID device.
| Service | Charateristic | Properties | Value |
|---|---|---|---|
| Generic Access | Appearance | Read | 0xC103 |
| HID | Protocol Mode | Read | 0x01 |
| HID | Report Map | Read, Encrypted | 0x05010906a101050719e029e715 002501750195088102950175088101 95067508150025650507190029658100c0 |
| HID | Report Reference | Read, Encrypted | 0x0001 |
| HID | Report | Read, Notify, Encrypted | 0x0000000000000000 |
Generic Access
A keyboard's standard appearance characteristic is 0xC103.
Report vs Boot Protocol
Under the USB HID specification, the report protocol is a standardized means of sending input reports to the host device. Because the input report can vary based on the input device, a report descriptor is sent during enumeration so that the host device can interpret the input report. The report descriptor is like bitfield describing the contents of the input report. This way, anything from a joystick to a keyboard can be interpreted by the HID protocol.
The boot protocol is a simplier, standardized protocol that is used when sending input reports. It is called the boot protocol because it is meant to be enumerated by the BIOSes, which have hardcoded interpretors so that they don't have to parse arbitary reports. I.e. the input report conforms to a standard keyboard/mouse input.
Report
The report map is a schema of how the report is going to be formatted. It is versatile enough to be used for any sort of input. Think of it as a bitfield. An 8 byte long bitfield.
Usage Page (Generic Desktop)
Usage (Keyboard)
    Collection (Application)
    Usage Page (Keyboard)
    Usage Minimum (Keyboard LeftControl)
    Usage Maximum (Keyboard Right GUI)
    Logical Minimum (0)                                ; minimum value is 0
    Logical Maximum (1)                                ; maximum value is 1
    Report Size (1)                                    ; create 1 copy
    Report Count (8)                                   ; 8 bit field
    Input (Data, Variable, Absolute) Modifier byte     ; add field to report
    Report Count (1)
    Report Size (8)
    Input (Constant) Reserved byte                     ; add field to report
    Report Count (6)                                   ; create 6 copies
    Report Size (8)                                    ; 8 bit field
    Logical Minimum (0)                                ; min is 0
    Logical Maximum (101)                              ; max is 101
    Usage Page (Key Codes)
    Usage Minimum (Reserved (no event indicated))
    Usage Maximum (Keyboard Application)
    Input (Data,Array) Key arrays (6 bytes)
    End Collection
| Value (Hex) | Item |
|---|---|
| 05 01 | Usage Page (Generic Desktop) |
| 09 06 | Usage (Keyboard) |
| a1 01 | Collection (Application) |
| 05 07 | Usage Page (Keyboard) |
| 19 e0 | Usage Minimum (Keyboard LeftControl) |
| 29 e7 | Usage Maximum (Keyboard Right GUI) |
| 15 00 | Logical Minimum (0) |
| 25 01 | Logical Maximum (1) |
| 75 01 | Report Size (1) |
| 95 08 | Report Count (8) |
| 81 02 | Input (Data, Variable, Absolute) Modifier byte |
| 95 01 | Report Count (1) |
| 75 08 | Report Size (8) |
| 81 01 | Input (Constant) Reserved byte |
| 95 06 | Report Count (6) |
| 75 08 | Report Size (8) |
| 15 00 | Logical Minimum (0) |
| 25 65 | Logical Maximum (101) |
| 05 07 | Usage Page (Key Codes) |
| 05 01 | Usage Minimum (Reserved (no event indicated)) |
| 05 01 | Usage Maximum (Keyboard Application) |
| 05 01 | Input (Data,Array) Key arrays (6 bytes) |
| c0 | End Collection |
This is the report map for a HID keyboard. There also other report maps available in the appendix of the USB HID specification.
So what you end up having in the report map characteristic is a long hex string of this report map characteristic.
BLUETOOTH_PRIVILEGED error on the nRF Connect
Do note that the Nordic nRF Connect App cannot snoop on BLE HID reports once it is paired to the computer. This has been true since Android 5.0 to prevent 3rd party apps from snooping on Bluetooth reports, which might contain sensitive data such as passwords.
The keyboard output is exposed through the HID service, so if you open any text editor, you should be able to see the words being printed. However this security feature makes Bluetooth HID diffcult to debug.
UART over BLE
UART over BLE is another useful feature that can be used to transparently transmit data over a BLE link. This allows you to transmit arbitary data over a BLE link by defining one service.
A common standard is the Nordic UART Service which is a GATT service that describes two characteristics that each hold and expect 20 bytes of 8 bit (char) data.
Nordic UART Service (NUS)
| Name | UUID | Shortened UUID | Properties | Fields |
|---|---|---|---|---|
| Nordic UART Service | 6E400001-B5A3-F393-E0A9-E50E24DCCA9E | 0x0001 | ||
| Nordic UART RX | 6E400002-B5A3-F393-E0A9-E50E24DCCA9E | 0x0002 | Write, Write without response | U8(20) |
| Nordic UART TX | 6E400003-B5A3-F393-E0A9-E50E24DCCA9E | 0x0003 | Read, Notify | U8(20) |
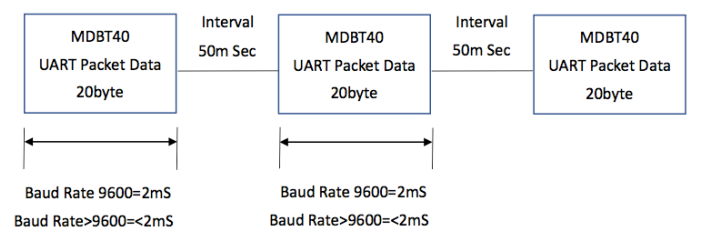
I wasn't able to find any hard specifications of NUS outside of the GATT characteristics, but it seems like you are allowed to transmit as fast as the receiving device can clear the RX buffer. The image above shows MDBT40's implementation of the NUS.
Revisions
- 5 October 2020 - initial publication
- 15 July 2021 - addition of new content relating to the Explorer board and new projects
References
- Silicon Labs Empty SoC Project Reference
- Silicon Labs Virtual COM Port Baud Rate
- Silicon Labs Wireless Technologies Whitepaper
- Silicon Labs Gecko Platform Reference
- Silicons Labs Bluetooth Platform Reference
- https://docs.silabs.com/resources/bluetooth/code-examples/applications/ble-hid-keyboard/source/gatt.xml
- https://docs.silabs.com/bluetooth/latest/code-examples/applications/ble-hid-keyboard
- https://e2e.ti.com/support/wireless-connectivity/bluetooth/f/538/t/390969?how-to-emulate-input-one-key-and-then-release-it-for-USB-HID-keyboard-emulation-using-cc2540
- https://www.silabs.com/community/wireless/bluetooth/forum.topic.html/working_hid_overgat-NgEk
- https://docs.silabs.com/bluetooth/2.13/code-examples/applications/using-em3-or-em4-energy-mode-in-a-bluetooth-beacon-app
- https://www.silabs.com/community/wireless/bluetooth/knowledge-base.entry.html/2018/11/07/using_bluetooth_secu-VDcD
- https://devzone.nordicsemi.com/f/nordic-q-a/29198/bluetooth_privileged-error-hid-keyboard
- https://web.archive.org/web/20200630215041/https://www.devever.net/~hl/usbnkro