Pegbot
Winner of the 2018 Tech Cup!

Pegbot is the robot that I submitted for the 2018 Tech Cup at Northwestern University. In this competition, robots are tasked to follow a rainbow line around in a loop and over a 45 degree ramp on a timer.
What does it do?
Pegbot is a robot that combines a microcontroller and an Android phone to track and follow a line.
Why is it cool?
I had to overcome several challenges to get the robot to work quickly and consistently. I feel that these lessons learnt can be applied forward in other robotics projects.
Introduction
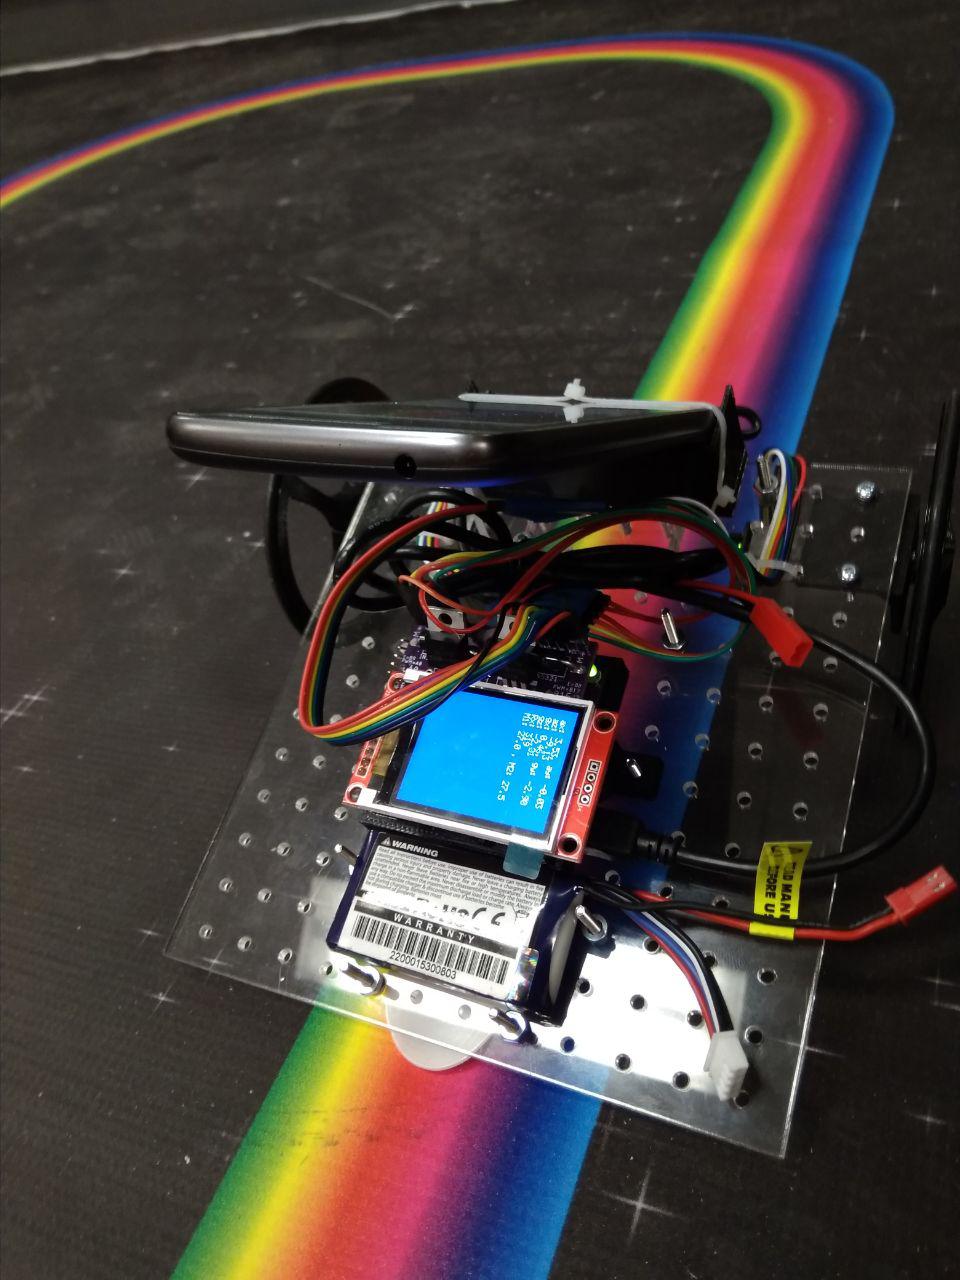
The base uses a piece of 1/8" thick acrylic with holes spaced at 0.5" apart. I found this to be an extremely useful design because items can be remounted without the need to redesign the base. The hole spacing is also guaranteed, so mounts can be redesigned quickly.
The motors used were from Chihai Motors. These are 12V motors with a gearhead and are slightly larger than the standard N20 motors. The motors were mounted underneath the robot, giving it more height and allowing it to mount and cross the ramp. Without this additional height, the robot would get stuck as it was cresting the ramp.
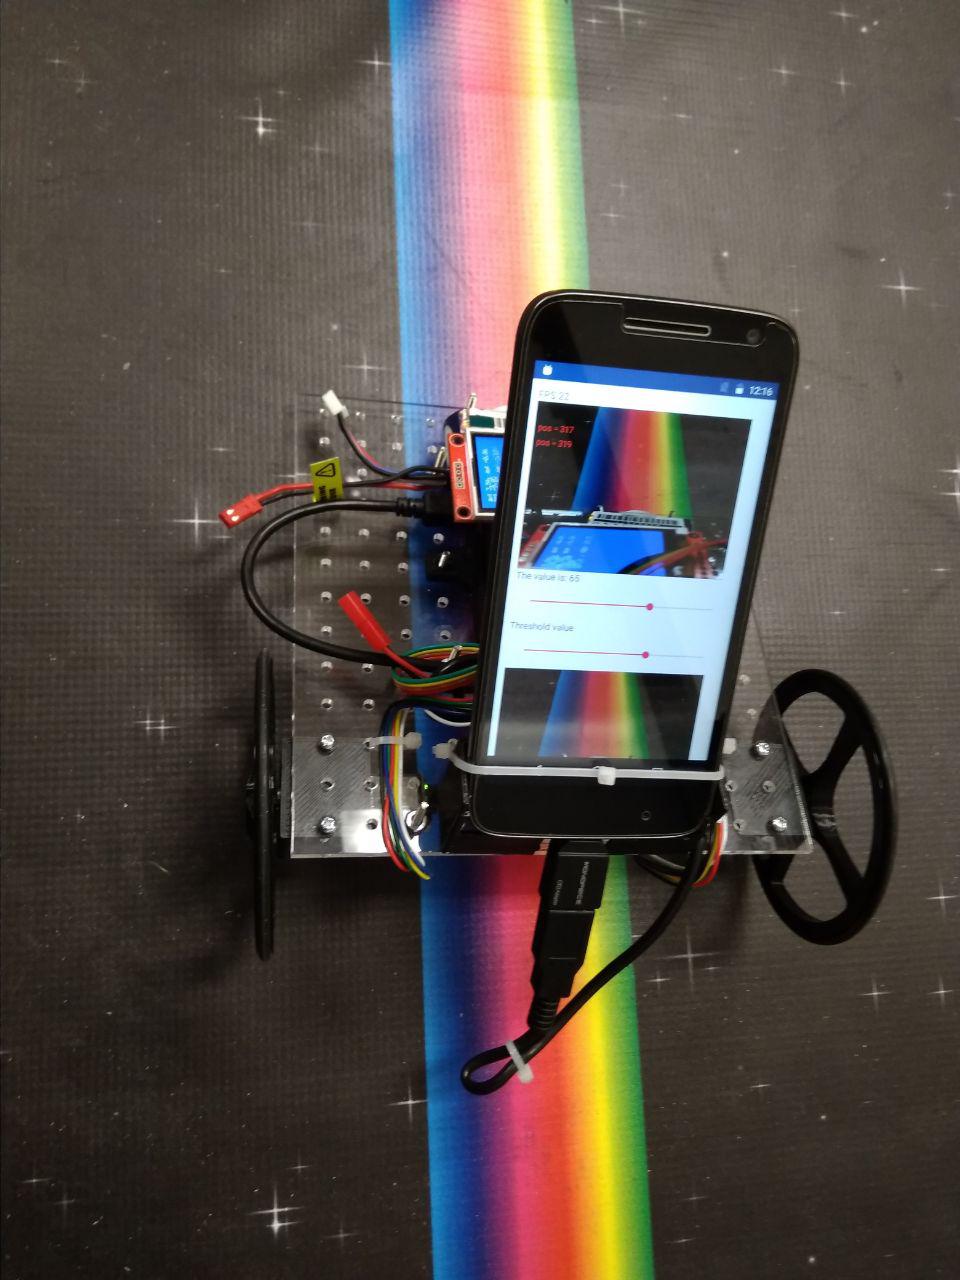
In order to navigate, an Android phone was used with basic image recognition. An image would be captured and the colors in a given row in the image would be processed. All the reds would be captured and a center of mass would be calculated relative to the right of the screen. This value is then sent back to the microcontroller that was running CDC code to communicate with the Android phone.
I used two rows to track the red line of the rainbow road using a provided center of mass algorithm. If the row did not see any red lines, it would return 0. Because I used two rows, if one row returned 0, I would only use the position from the other row. If both rows returned a valid value, I would take the average, and when both rows returned 0, I would then use the last best value. This gave the robot more room for error when it lost the line.
One big challenge faced when designing Pegbot was the mounting of the phone. Because The phone was so tall, and the microUSB cable jutted out of the port quite a bit, mounting it vertical on the base would require a very tall support. So I decided to mount it flat on the robot. One major disadvantage of putting the phone so close to the tracking line is that the change would be very rapid. Because of how much the image covered the screen, if the robot swerved a little, it would immediately lose the line.
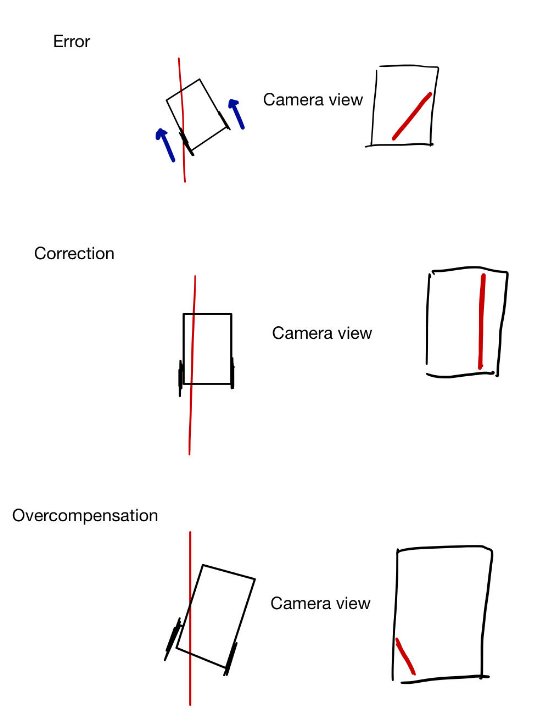
I then decided the mount the camera flat on the robot, but pointing backwards. Since the robot was elevated slightly, it would be able to track the line better than if it was mounted flat in front. However, this introduced some interesting dynamics. Because the camera is behind the wheels, using PID is not useful for control. Assume that the robot is swerving to the left, on the camera, the image of the line moves to the right. In order to correct this, the robot turns to the right. Now the line is parallel to the screen, however, it is displaced horizontally. However, we want the line to be in the middle of screen, so the robot turns further to the right. This would then cause the robot to lose the line as it tries to correct itself. Not good.
Mount sensors in front of actuators
So now the problem is to point the camera forward. After much fiddling and rearranging of components, I managed to get the phone mounted at an angle on the robot, and crucially, the microUSB cable extended past the base (this caused a minor issue when the robot was going uphill as the cable would sometimes drag along, but all I had to do was to shorten and bend the cable).
Another problem that I faced with the robot was weight distribution. In order to go uphill or have any kind of forward force, I found through experience that having a rear wheel drive puts a greater normal force on the wheels, increasing the friction and grip of the robot. This effect is more pronounced if the robot is angled downwards. In an informal test at 100% speed with the motors mounted on the front of the robot, it was only able to hold the position. At 25% speed with the motors mounted on the back, it was able to climb the 45 degree slope with ease.

The issue with weight was that if I put too much weight on the rear of the robot, it would tip over backwards as it went uphill. Too much in front and it would have too much friction and not enough grip. I found that the greatest fix for this is not to add weight to where you want it, but to shift the weight around on the bot. This keeps the robot light while achiving what you wanted.
Rear wheel drive and redistribute weight to balance the robot.
Because of the update rate on the camera screen (20Hz), the sensing was limited, and this limited the speed because between one frame and the next, you could lose the line. The solution is then to set an extreme value to be sent back to the microcontroller when the line is lost, and to multiply this value by a modified coefficient so that the robot would make a sharp turn to find the line. This allowed the robot to lose the line for awhile, and therefore allowed for a larger speed along the straight portions of the path.
Line tracking doesn't have to be perfect
Another interesting observation that I noticed was that if the PID was tuned correctly, the robot will keep the line to the center, even when turning. If it isn't, then one wheel exhibit jerky stop and go motions as the robot is turning, and when the robot comes back to a straight portion, the path will look like a decaying oscillation. For this robot, I found that using only proportional control was sufficient, as integral control seemed to cause instability in the tracking performance. No feedback from the encoders was used because the robot was using the camera to travel in a straight line over short distances. One useful method I found was to vary the maximum PWM based on the line's position on the screen to improve the robot's tracking performance especially around tight corners.
Conclusion
Building this robot was fun and educational. I learnt alot about how to deal with noisy data and tuning a robot. The official time for the Pegbot was 55 seconds.