One Wire Protocols (5)


In your package you might have a tiny white chip with three wires sticking out of it. This is a 5050 LED IC. What this chip does is that it combines three small but bright LEDs into a neat little package and by using some clever signalling, these LEDs can be made to shine at any level of brightness you desire and generating any color you want within the spectrum.
In this lesson, we will be using Adafruit's NeoPixel library which is available here. If you don't know how to install a library yet, the Arduino website provides a good guide to getting up and running quickly.
Programming
In order to use the library to run our pixels, we have to include it as follows:
#include <Adafruit_Neopixel.h>
Now we will introduce a new way of defining variables as follows:
#define NUMPIXELS 1
#define PIN D1 //connect to D1 of ESP8266
#define PIN 0 //connect to P0 of ATTINY85
This is useful if you want to give a constant value to a name. Naming your variables adds clarity and simplicity to your program. Instead of having to change a variable in multiple places, you can now change it in a common place. This compartmentalisation will help in writing larger programs.
Next we want to set up our configuration for our 5050 chip. This should be included under setup.
Adafruit_NeoPixel pixels = Adafruit_NeoPixel(NUMPIXELS, PIN, NEO_GRB + NEO_KHZ800);
Now to break this down a little, Adafruit_NeoPixel refers to the type of value we are dealing with. This is similar to int or float. In this case, we are telling the IDE that "pixels" is a special value that is defined in the library. It takes in a number of variables, namely the number of pixels we are using and the pin number. We also have to specify the protocol, which we don't have to worry about in this instance.
Now when we want to use our pixel, we merely have to refer to pixel.
Now the way we use the chip is that we define the colors first, and then we show them. It is like priming each pixel with a preset value before turning them all on simultaneously.
pixels.setPixelColor(0,pixels.Color(155,155,0));
pixels.show();
setPixelColor is a function that takes the the number of the chip in series you want to modify, and the color you want to modify it to as an RGB value. show takes no values and changes the color of the LED to the one you just defined.
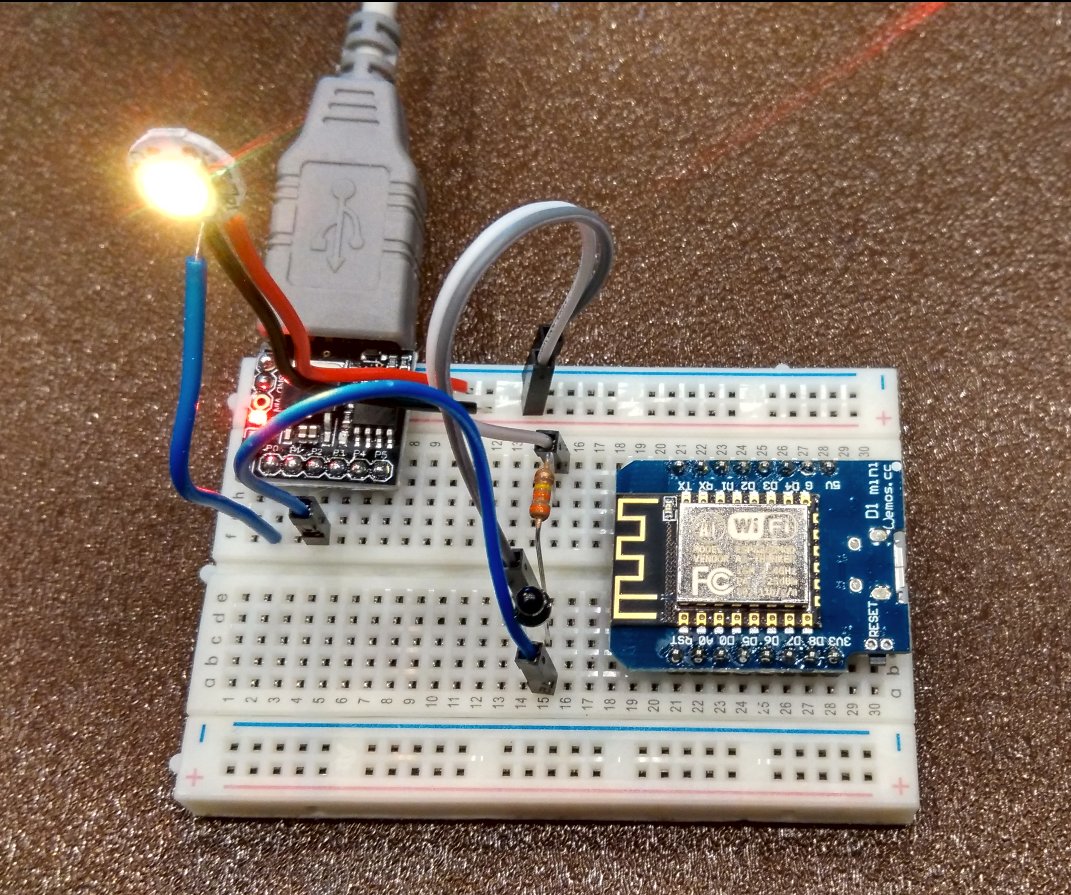
Figure 1. Wiring schematic
Now you do something fun to scale the colors according to input. Knowing that each RGB value is from 0 to 255, we can use a linear scale from 0 to 765 to pick a color. Mixing two colors is more fun than having separate RGB values, so as one color fades, another color starts to brighten. Scaling our analog input, we can then display a range of colors dependent on our input.
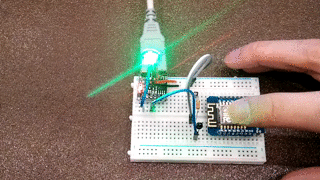
Figure 2. Lighting in action
Sketch
#include <Adafruit_NeoPixel.h>
#define NUMPIXELS 1
#define PIN D1 \\ config for ESP8266
#define INPUT_PIN A0 \\ config for ESP8266
#define PIN 0 \\ config for ATTINY85
#define INPUT_PIN 1 \\ config for ATTINY85

int r = 0;
int g = 0;
int b = 0;
int input_value = 0;

Adafruit_NeoPixel pixels = Adafruit_NeoPixel(NUMPIXELS, PIN, NEO_GRB + NEO_KHZ800);
void setup()
{
    Serial.begin(9600); \\ config for ESP8266
    pixels.begin();
}


void loop()
{

    input_value = analogRead(INPUT_PIN);
    input_value = (input_value/1024) * (3*(255));
    Serial.println(input_value);
    if (input_value<255){
        r = input_value;
        g = 0;
        b = 0;
    }
    if (input_value<510 && input_value>255){
        r = 510 - input_value;
        g = input_value-255;
        b = 0;
    }
    if (input_value>510){
        r = 0;
        g = 765-input_value;
        b = input_value-510;
    }
    pixels.setPixelColor(0,pixels.Color(r,g,b));
    pixels.show();
    delay(10);
}
FAQ
- Help! My 5050 chip doesn't light up!
- Check that you are connected to the right pins and all leads are secured. Some unexpected values are caused by loose leads.
- Check that your resistor value is high enough. One way is to test the values in the
setup. If the resistor value is too low/too high the output will be 0 or 1024. - Check that you have put your photo-transistor in the right direction. The long lead of the photo-transistor goes to
GND.
- Help! It is still not working!
- Check for crossed leads and test the LED with a single value. If it still doesn't light up, your 5050 LED might be damaged, though that is usually unlikely.