Silicon Labs EFM8 'Bee' Series
Life after Arduino. A review of a serious contender for the 'simple project' microcontroller.

Silicon Labs offers a series of 8-bit microcontrollers that specifically target certain use cases. They come with excellent documentation and a breathtaking amount of example code to get every feature and aspect of the microcontroller working. When you combine this with an affordable J-Link enabled development board and a gorgeous, cross-platform, Eclipse-based IDE, you practically have your next project built.
Tldr; this should be your next 8-bit project.
Who should care?
If you are looking for the next step from Arduino, I strongly recommend Silicon Labs EFM8 series of microcontrollers for two reasons:
- Excellent software support and documentation. I cannot emphasize how many times I have picked products just because of how they are documented. Documentation will save you a lot of time and heartache down the line.
- Emphasis on registers. Silicon Labs emphasizes the use of registers when programming instead of providing an overarching SDK. This is a break from Arduino and provides a good opportunity to learn another form of programming. Instead of referring to the API of the SDK, instead you will just refer to the datasheet of the device. Don't be afraid! Using registers is as easy as referring to the datasheet.
While the EFM8 series does not have a huge latitude in terms of capabilities, they do come with very specific features:
- Laser Bee: Precision analog sensing projects. Inbuilt DAC and ADC.
- Universal Bee: USB-based projects. USB library, on-chip 3.3V regulator
- Busy Bee: General purpose.
- Sleepy Bee: Low power projects. Touch sensing.
These features are very targeted and will actually help you to narrow down the scope of your project. For example, perhaps you want to build a keyboard or a peripheral something that interacts with a computer, then the Universal Bee would be good choice!
I found that a lot of the peripherals make sense once you consider them in light of their use cases. For example the Laser Bee only has a I$^2$C slave. Why is that? Well, if you are using the Laser Bee, it is probably to take advantage of the analog sensing peripherals. For a small enough project, the Laser Bee serves well as the main MCU. But for a larger project with more peripherals, it is unlikely to be the main MCU as it would not be powerful enough. Therefore, having just a slave module that allows it to talk to a more powerful MCU makes sense. Another unique design feature is the 3.3V regulator in the Universal Bee, which is geared towards USB projects. I have never used a USB connector without a 3.3V regulator in my designs. Having the regulator in the IC is a welcome surprise, because it saves on both the parts required and the board space. A lot of thought goes into the design of these microcontroller and this translates into design choices that seem really obvious in hindsight.

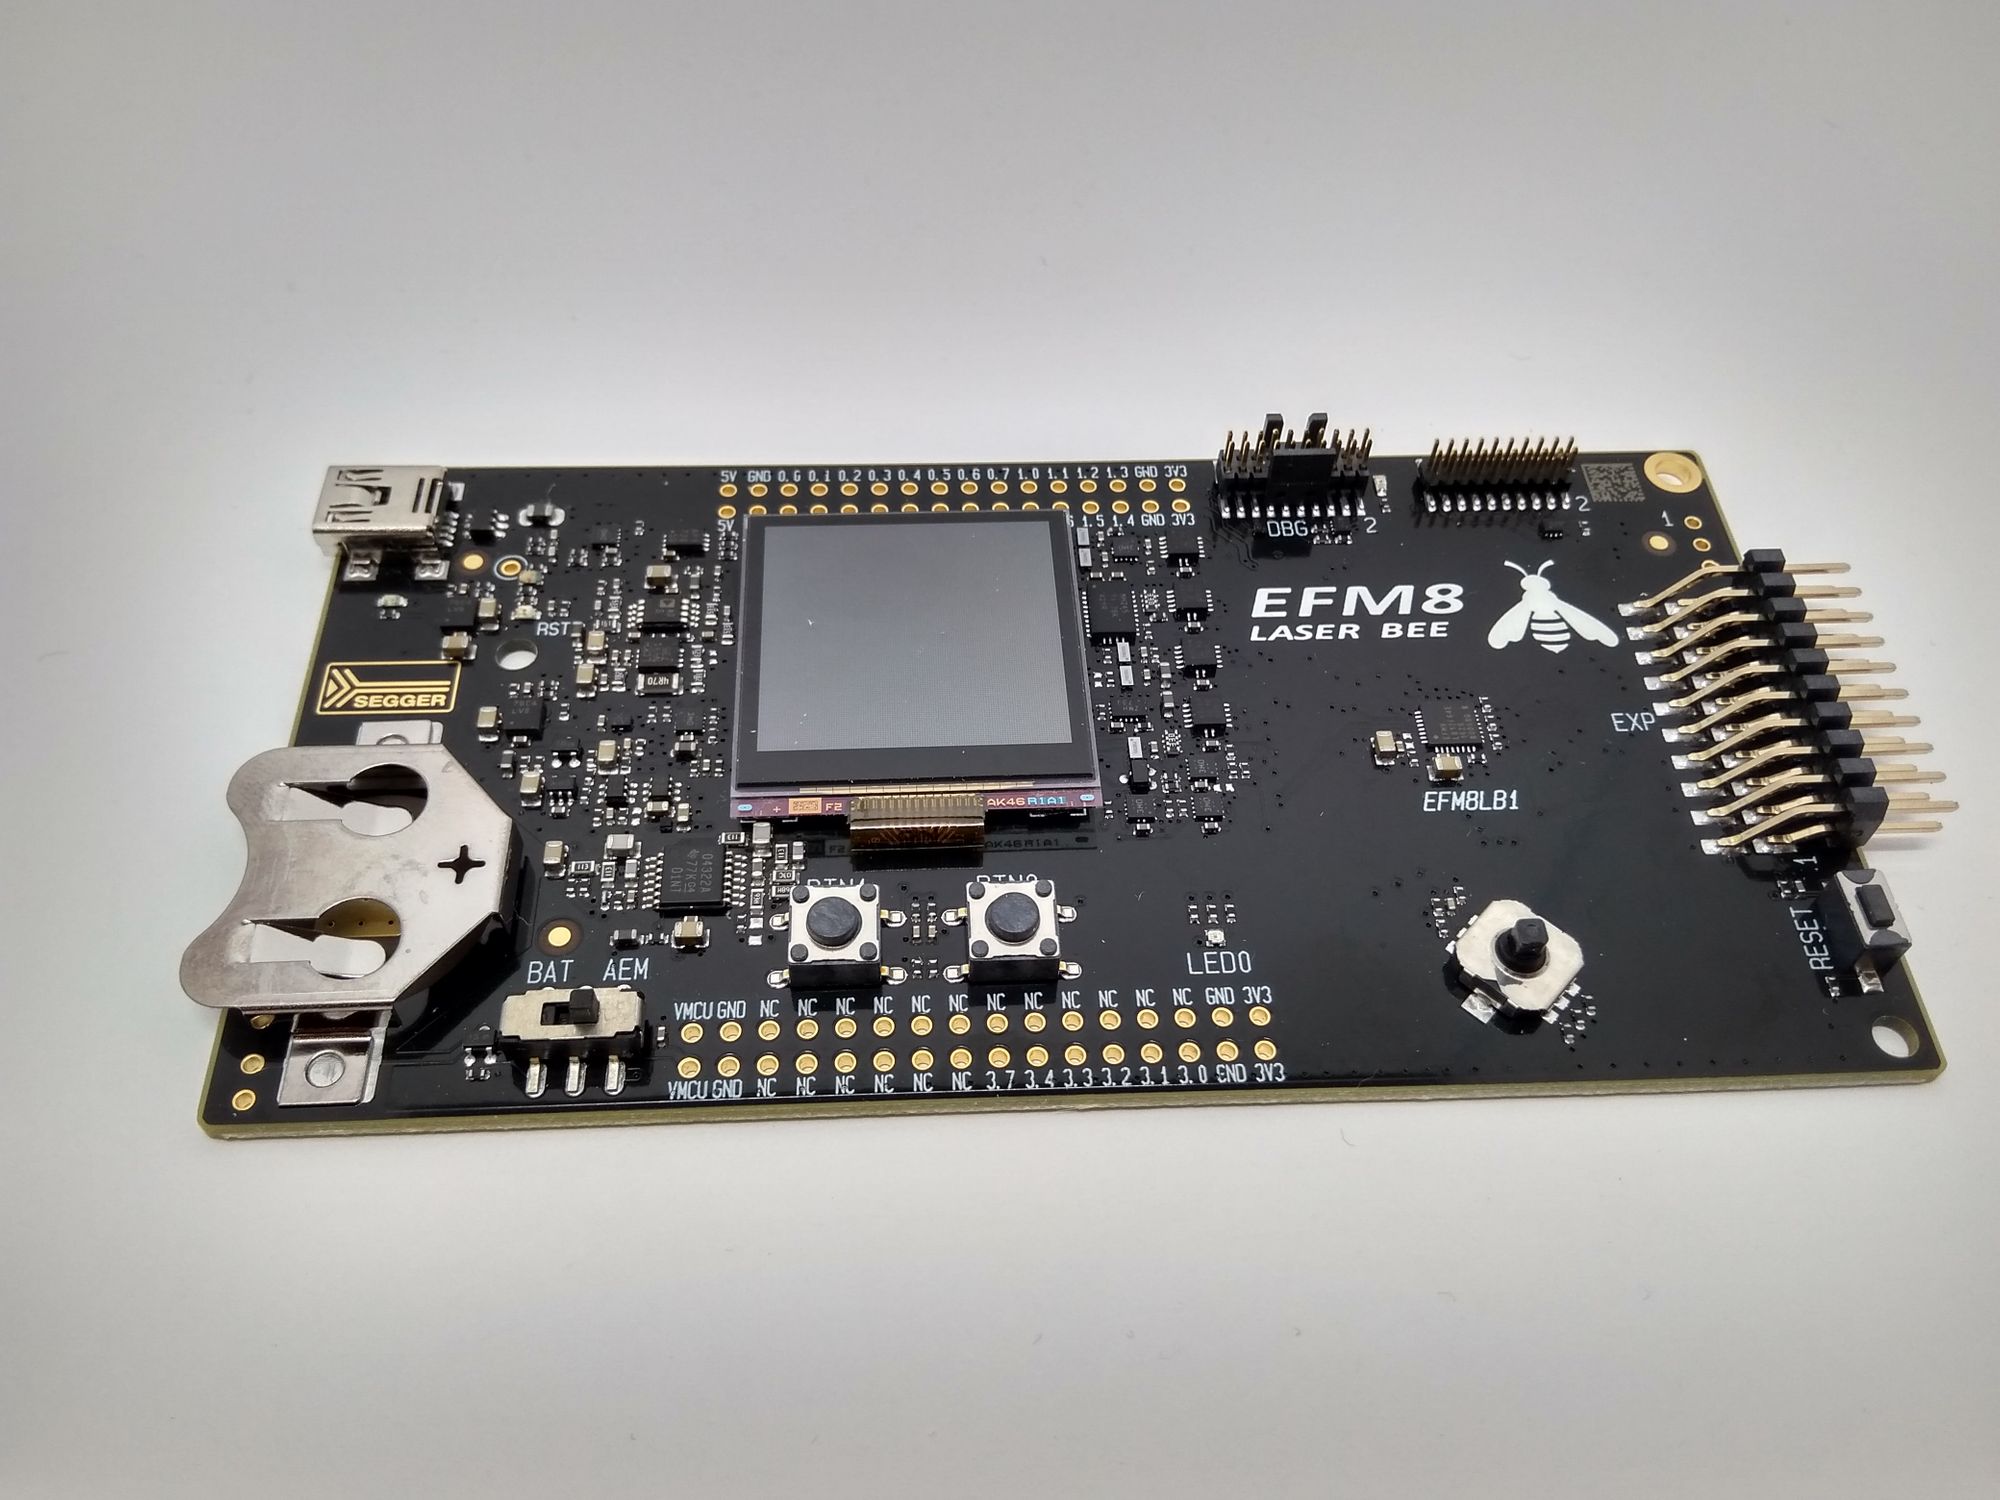
The development board costs as much as an Arduino: \$30. But these boards come with current sensing from 100mA down to 10nA, which more than justifies the price tag. They also come with a SHARP Memory LCD (which is currently going for $24 on Adafruit) can you can use for debugging, a joystick, and two buttons. On top of that, you can also use these boards as programmers for other custom boards that you might design, or even other microcontrollers that use the J-Link for programming.
Getting started
When you first download Simplicity Studio, you will be greeted with this screen:
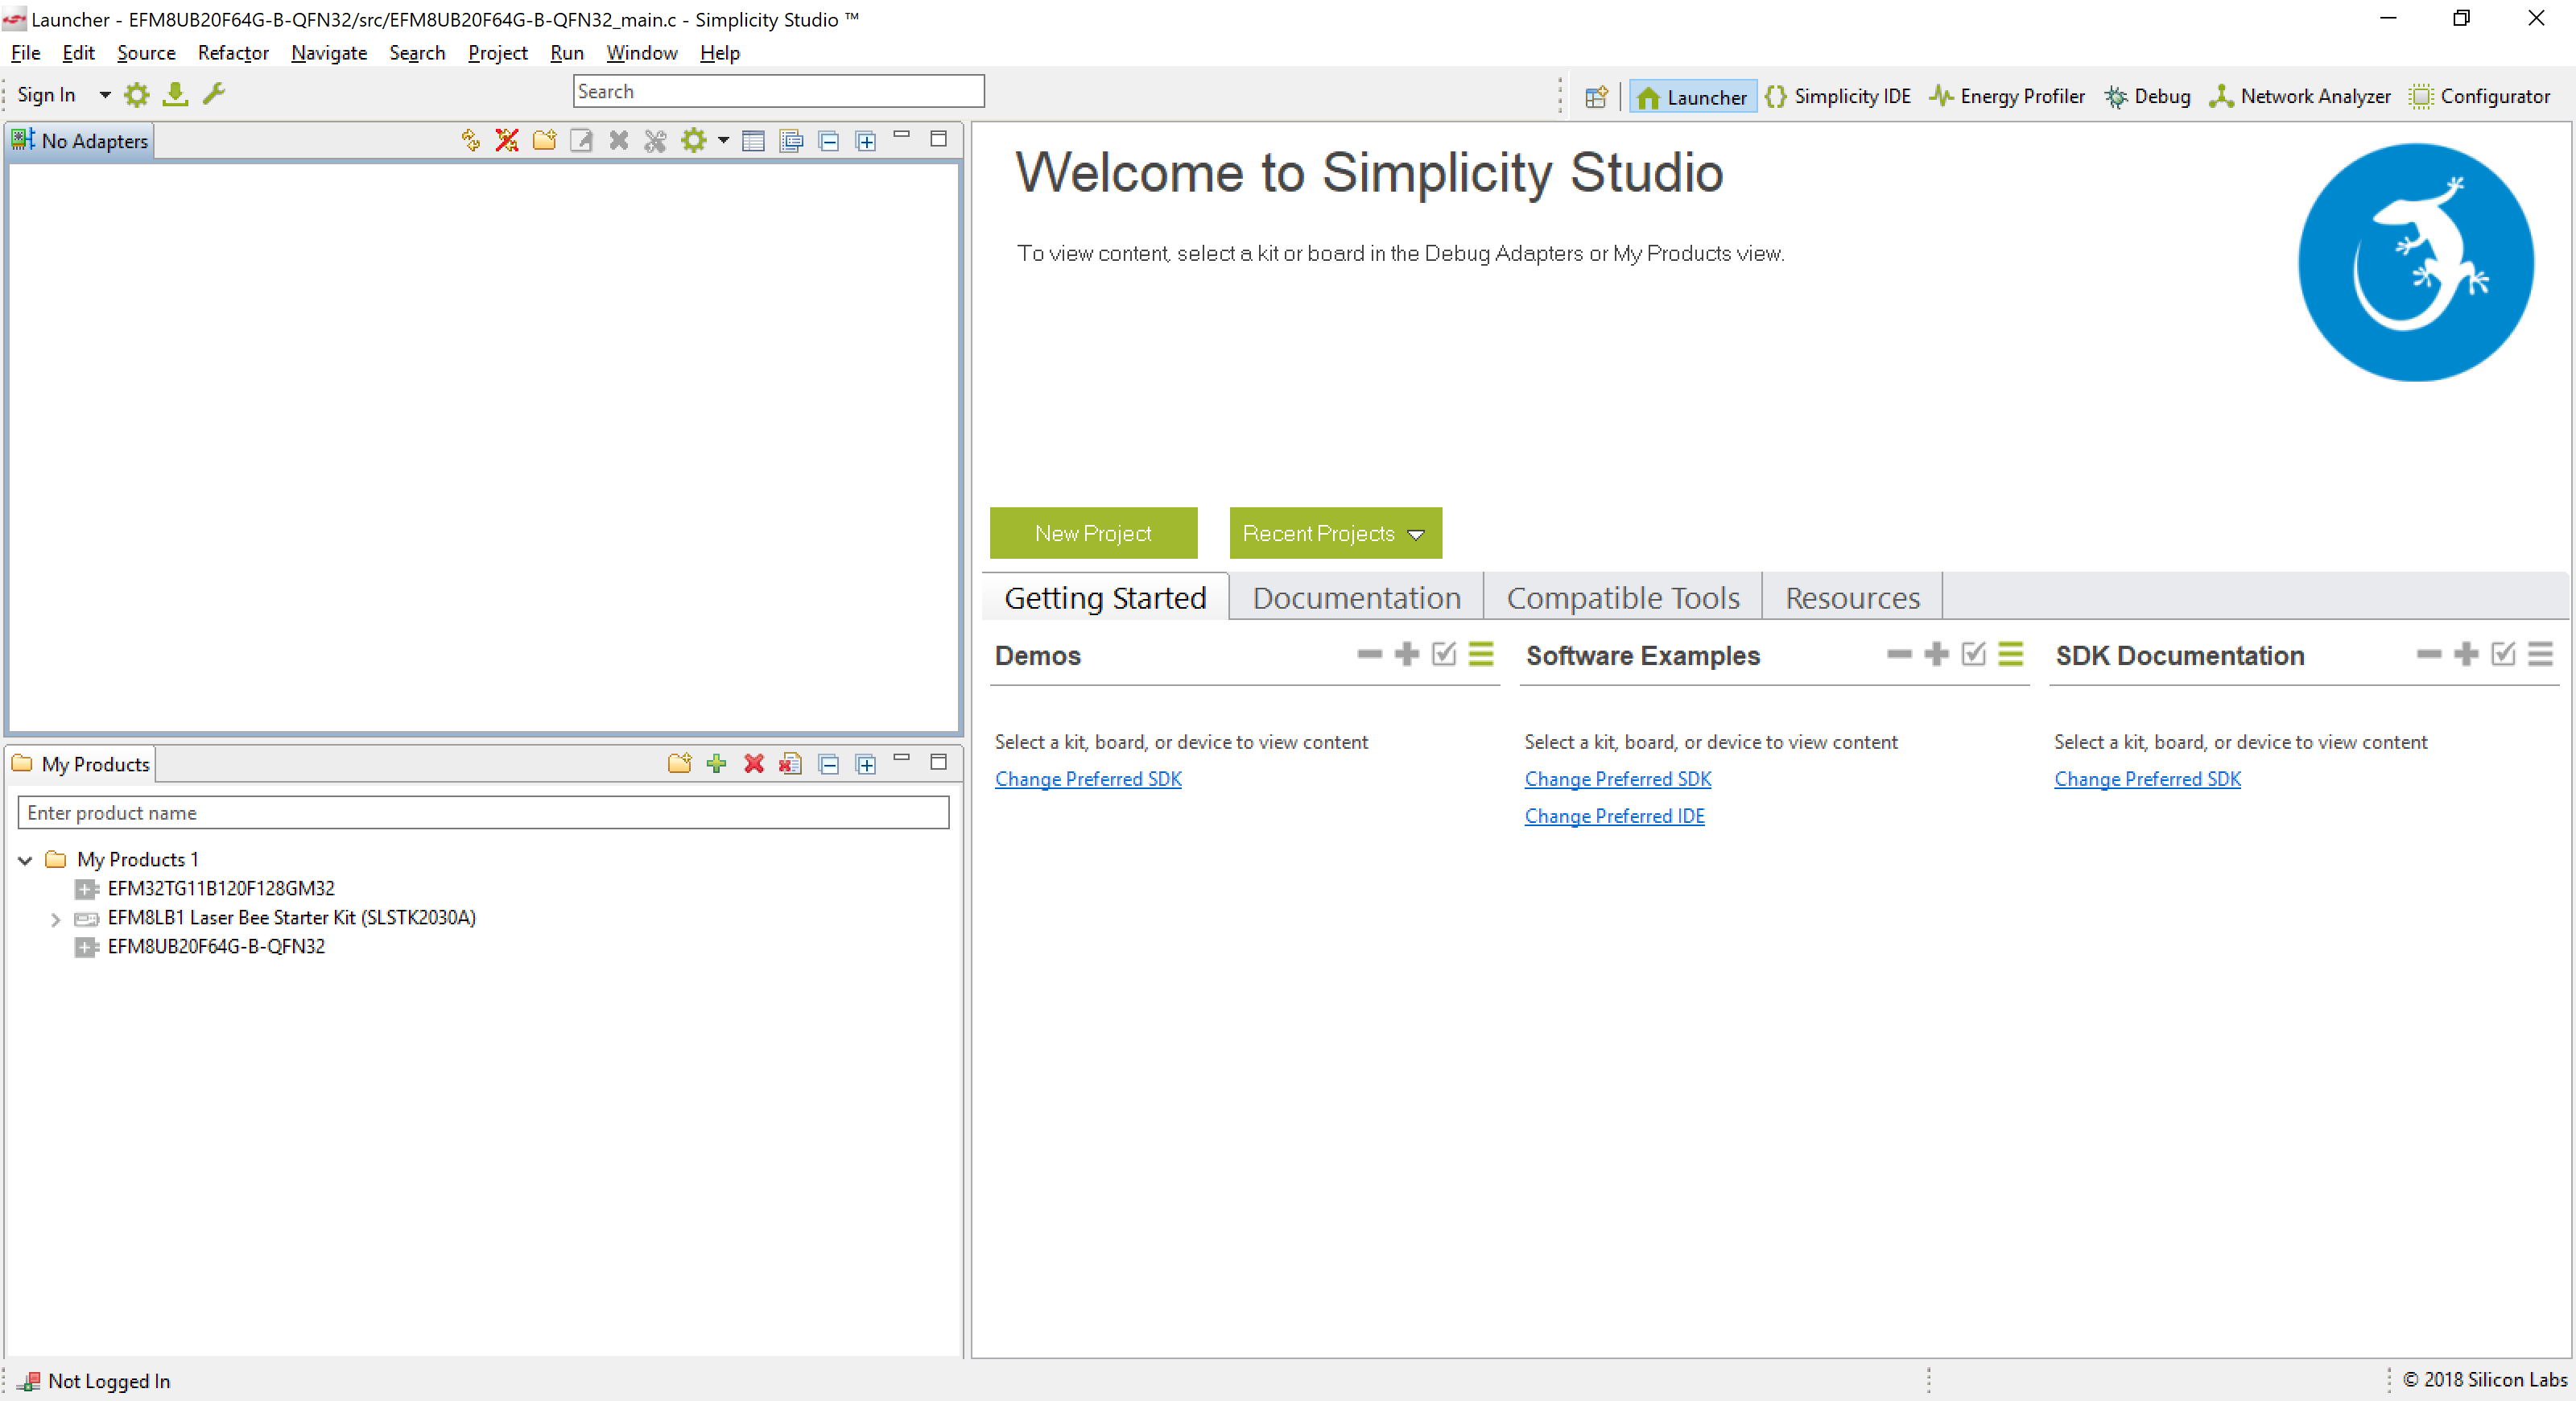
The launcher detects any development board that you plug in. The neat thing is that it loads up the correct demos and examples for the correct microcontroller. This is in stark contrast to Atmel, where code examples are not only hard to find, but are sometimes non-existent for the chip you are looking for. What I like about this view is that the "New Project" and examples are right in the middle of the page, easily found.
On the top right are your views, and they are actually quite well arranged. In logical order, you start with the Launcher, and then go into the IDE to program, after that you either use the Energy Profiler to determine how much power your system is drawing or to Debug to hunt for bugs. The last option, Configurator, used to configure new microcontrollers, was added by me.
This is a clean, usable interface, with absolutely no extraneous buttons. There is no debug button or build button in the Launcher view, which makes sense because at this point you don't have any code to debug yet.
The Eclipse-based IDE feels very zippy compared to Atmel Studio.
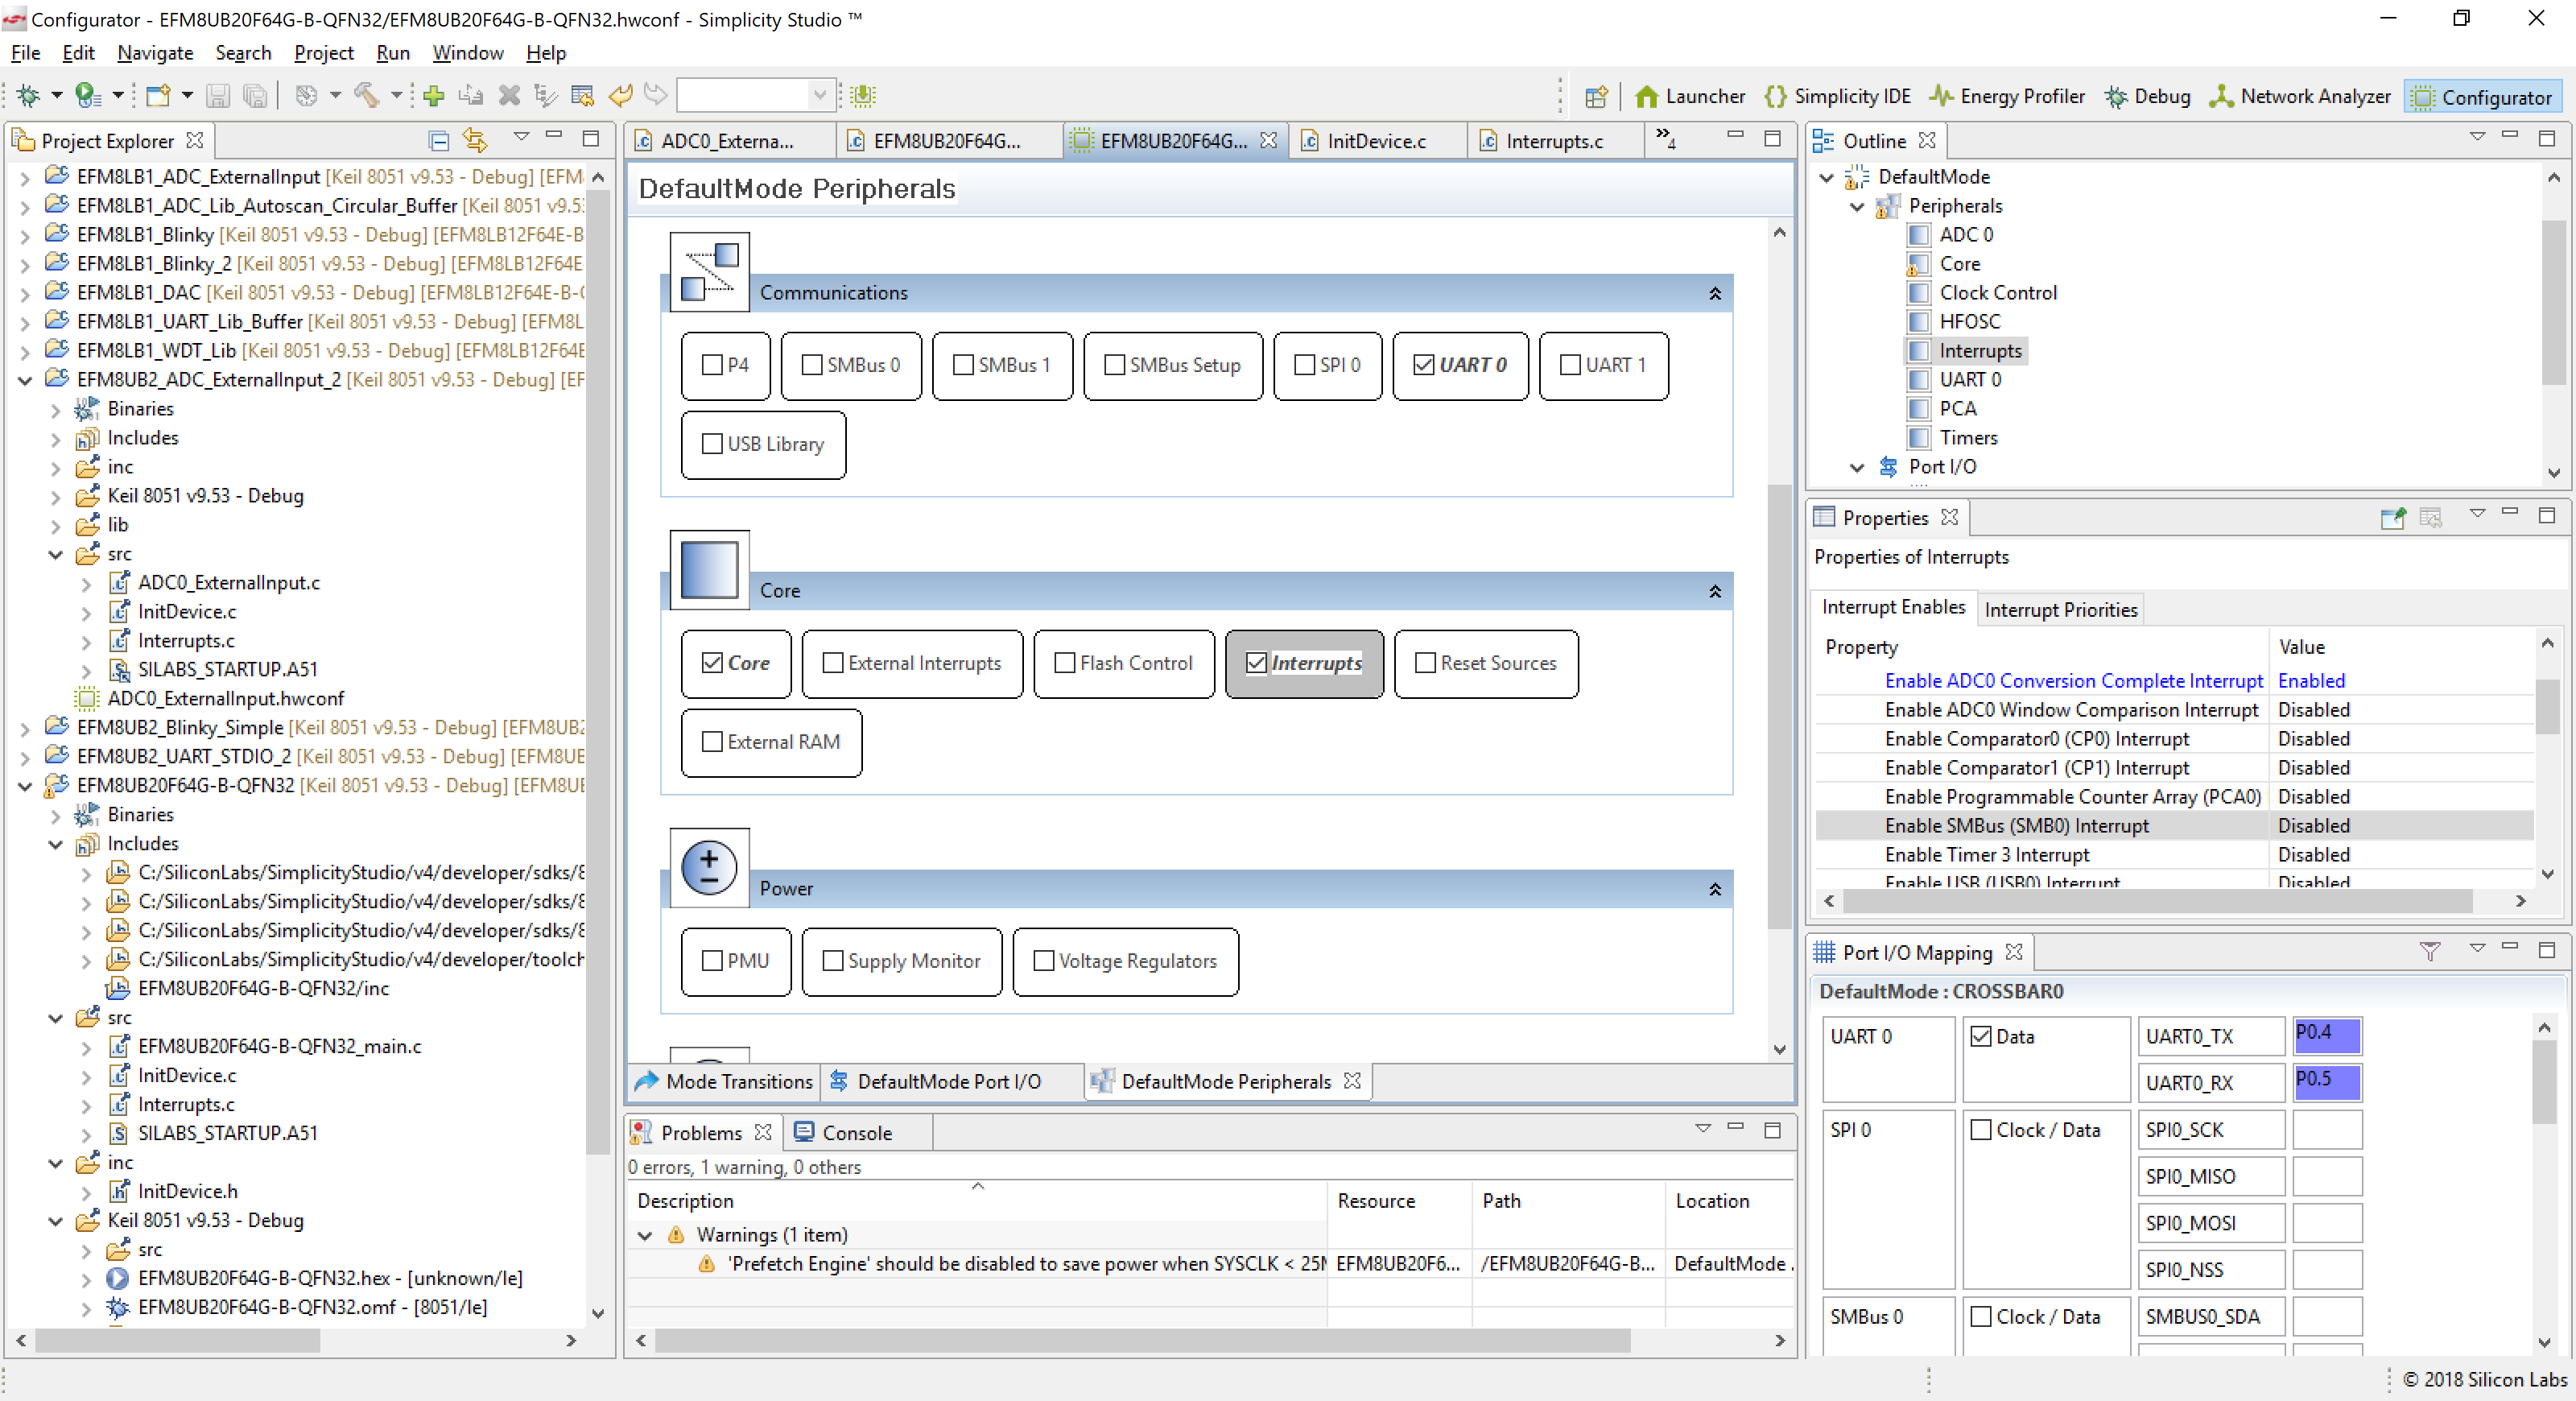
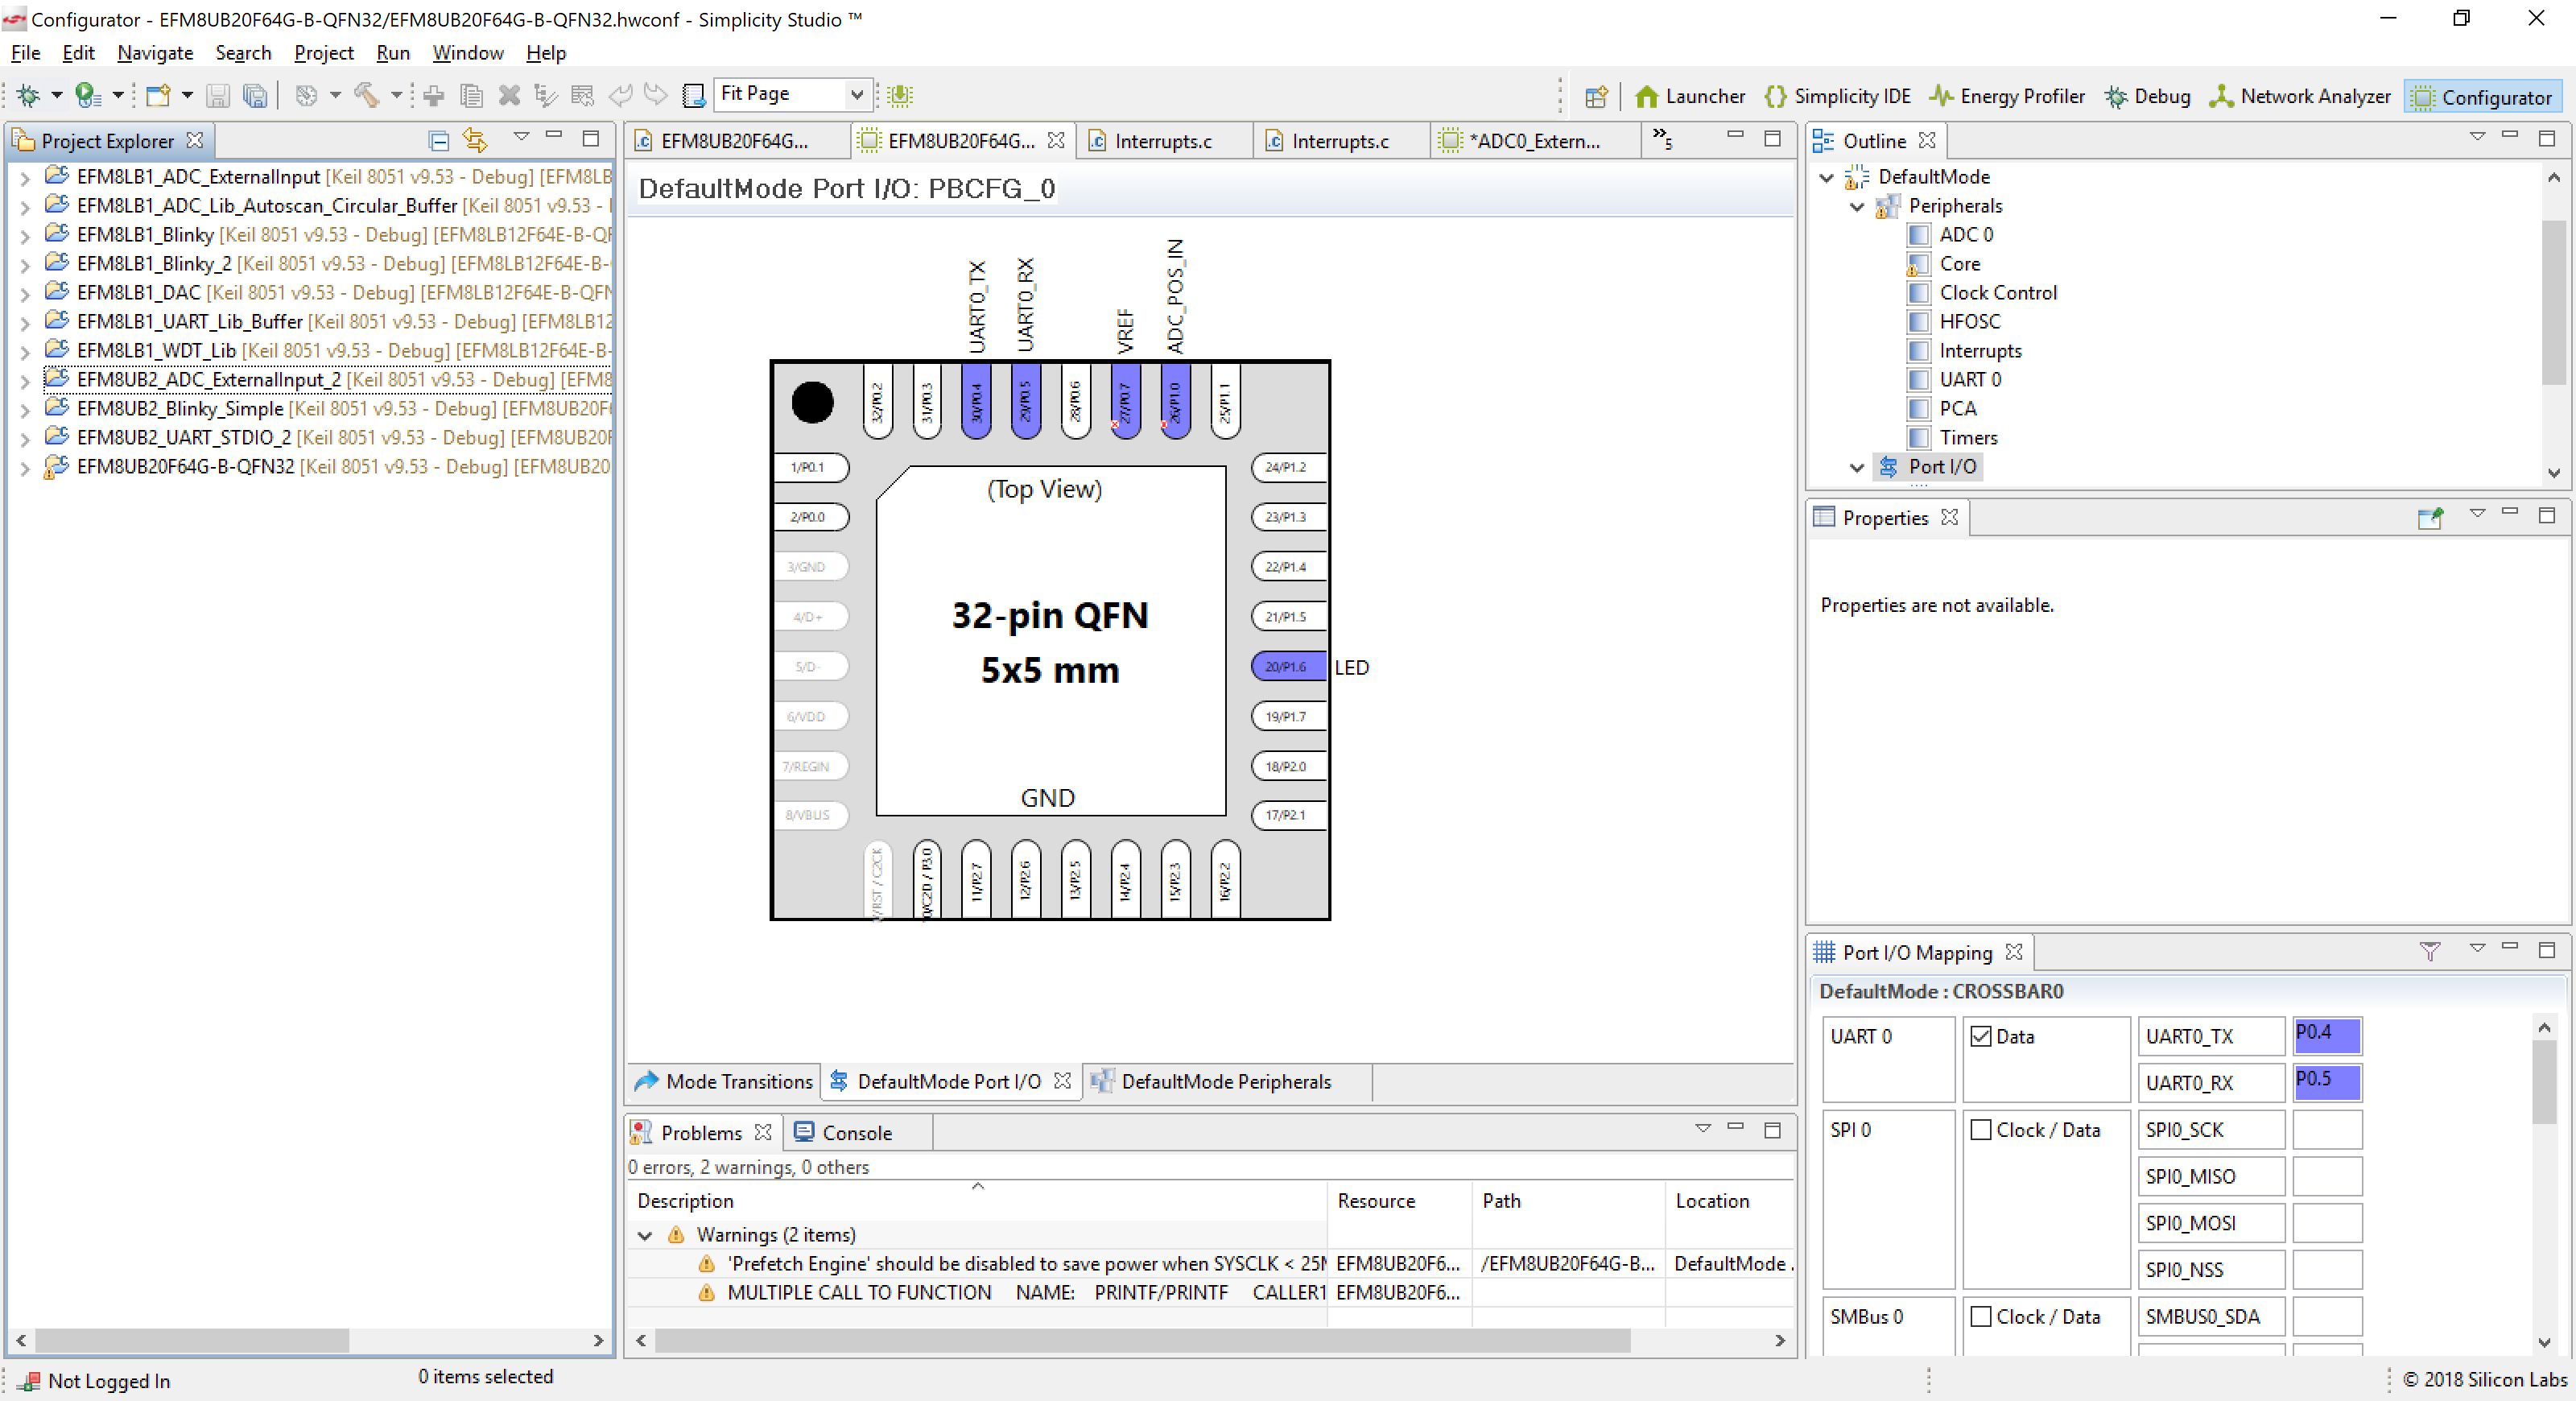
The Configurator is Silicon Lab's answer to ST Microelectronic's CubeMX. I was worried for a second about configuring a new microcontroller for example projects but this set me at ease immediately. It comes with the same indispensable view of the pins as defined on the microcontroller itself, very useful for building a circuit or debugging one.
This works the same way as the CubeMX: pick a pin, configure it, save, and the project's code is updated automatically. I did prefer CubeMX's layout, because I felt it was clearer. It is sometimes hard to keep track of what must be changed in the Configurator, and I ran into an issue where I kept forgetting to set up the timers properly for the interrupts, but I expect more time with this system would reduce this occurrence. I found it useful that the system does warn you if anything is wrongly configured immediately.
One thing that I liked about the Configurator over CubeMX is that you can take any example project and view the configuration in Configurator instead of having to comb through the startup file. CubeMX is not as strongly integrated into the IDE and example projects, and I felt this was another example where SiLabs' design of the entire development process shined through.
Update (9 Aug 2020)
ST has merged the STM32CubeMX with Atollic Studio to create the STM32CubeIDE. The experience now is quite tightly integrated and very enjoyable. However, Silabs still has the superior IDE because it auto-detects and downloads the appropriate SDK when you plug in the dev board. With Simplicity Studio 5, some UI tweaks have been made to make it visually pleasing to use.
The IDE has a great interface, primarily because only the main icons are set up organized in terms of priority and use. This is the default view, clean, simple, and unobtrusive, and you can add more options easily as you get more experienced.
Crossbar
The crossbar helps you to route GPIO signals to any unused pin.
Why these microcontrollers?
My interest in exploring the features of this line of microcontrollers is to establish a small microcontroller for simple projects. The other contenders are the STM32 line, the ATSAMD10 line, the ATTiny85, and the Padauk line. The following is a discussion of the pros and cons of each line against the EFM8.
ATTiny85
Update: I no longer recommend the ATTiny85 for development.
If I am sensing and just doing a simple conversion of the data, I tend towards the ATTiny85 with Arduino support. However the ATTiny85 has some drawbacks because debugging is a little challenging without a UART output. This recently became very important in one of the projects that I was working on and was actually the main impetus for me to start looking again.
Atmel's support and documentation for their chips is patchy, so I decided against using Atmel Studio for programming
STM32
Update (9 Aug 2020): The STM32G0 has a SOP8 package, which has the right balance between size and soldering complexity.
The STM32 line is limited in terms of the physical size of the microcontroller. The smallest they offer is a TSSOP package on the lowest end, which is about 4 times the size of a QFN module with the same number of pins. While this saves on soldering complexity, it sacrifices a lot on the board space.
However, having the CubeMX take care of peripheral configuration is a pure joy and a big reason why I would want to work with the STM32.
ATSAMD10
The ATSAMD10 has a QFN package, however it uses the clunky Atmel Studio, and updating the peripherals takes a lot of time because the ASF Wizard is slow to launch. While I have quite a bit of code written so that I can create projects easily, the lack of an auto-configuration tool like the CubeMX has made it very tedious to create new projects.
Padauk MCU
The Padauk MCU line is incredibly cheap, and yet they are quite easy to program because of the smaller register set. However, they are only available through sources in China and Taiwan, and is generally not available in QFN packages. Parsing the documentation can be frustrating because not everything is spelt out clearly. Therefore, I do not recommend them as your next step from Arduino.
Physical Package
Almost all of the Bee series MCUs come in QFN packages. This is a definite plus for me because a small physical footprint means a smaller board. They also come in friendlier SOIC-16 and TQFP packages.
Final Verdict
Strong software support and great documentation is a winning combination. With easy-to-use hardware kits and tight integration between software and hardware, it makes SiLab's entry hard to beat. It is also cost-friendly to the budget-strapped because ICs can be obtained in the sub $0.50 range for single quantities. The intangibles, like an IC that is easy to obtain from major distributors, as well as a 10 year commitment, puts it over the competition.
This is definitely a chip you would want to have in your back pocket. And if you are interested, I'll let SiLabs themselves help you choose the best microcontroller in their EFM8 line for you.