How I built a YNAB-like budget in Google Sheets
How I created a YNAB-like budgeting system in Google Sheets. Benefits: $0/yr + an automated budgeting pipeline that requires minimal management.


Budgeting is useful for me to take note of how much I spend a month. If I had to estimate how much I spend, I can be off the actual amount by as much as half.
I tried a few apps and methods to keep track of my finances. In particular, I really liked You Need A Budget (YNAB) because it is simple to use and offers integration with your bank account, so you can track your finances without having to spend additional effort recording every transaction. I also liked Mint for it's simple interface.
However, for how much I was using these apps, what I was doing could really be relegated to a spreadsheet. A lot of people use spreadsheets to track their spending. But I figured because I'm lazy and want the process to be as smooth as possible, I should automate as much as I can to reduce friction and keep budgeting as a habit.
Tldr: I replicated a budgeting process from using a few apps in Google Sheets and automated it to make the process as seamless as possible.
As a side note I called my process: Build-A-Budget.
Template: https://docs.google.com/spreadsheets/d/1bcfHy1td3jCyRLbQF0TWjCJaG4t_uihQDLFWwB0K8e8/edit?usp=sharing
Features
- Automatically updates every month and creates a new spreadsheet
- Custom menu to add new entries without having to update each cell
- Automatically balances the budget if you are overspending in one category
I chose Google Sheets because it is a free product that I can access anywhere without having to download additional apps. Google Sheets also it comes with a scripting engine that ties in all the other Google products, this means that you can potentially integrate it with Gmail and Calendar.
You can go to Google Apps Script here: https://script.google.com/home/start
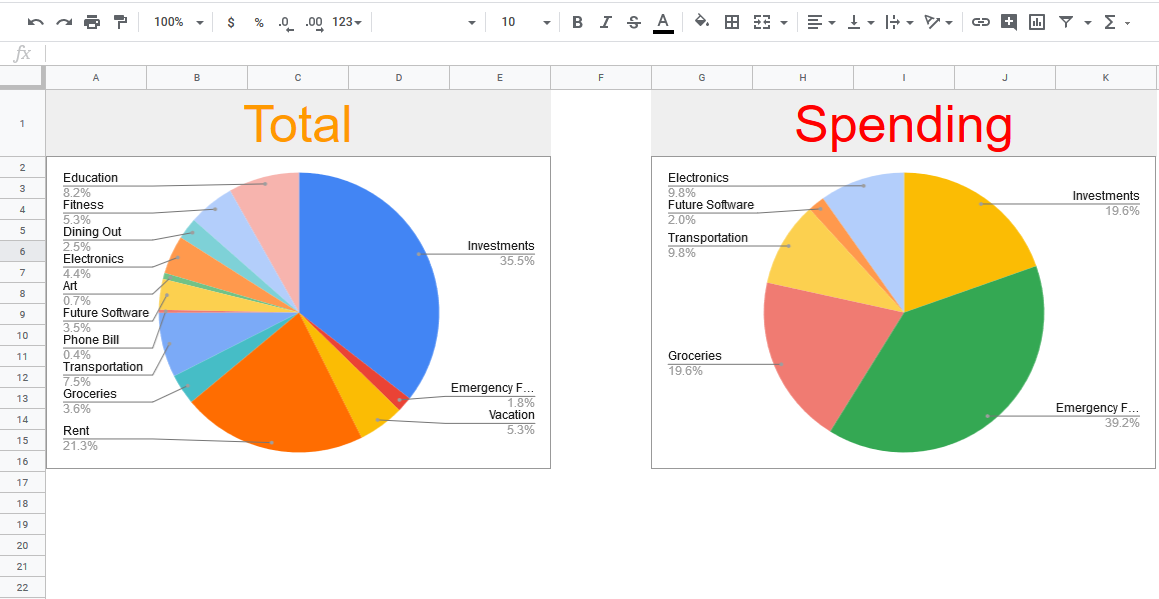
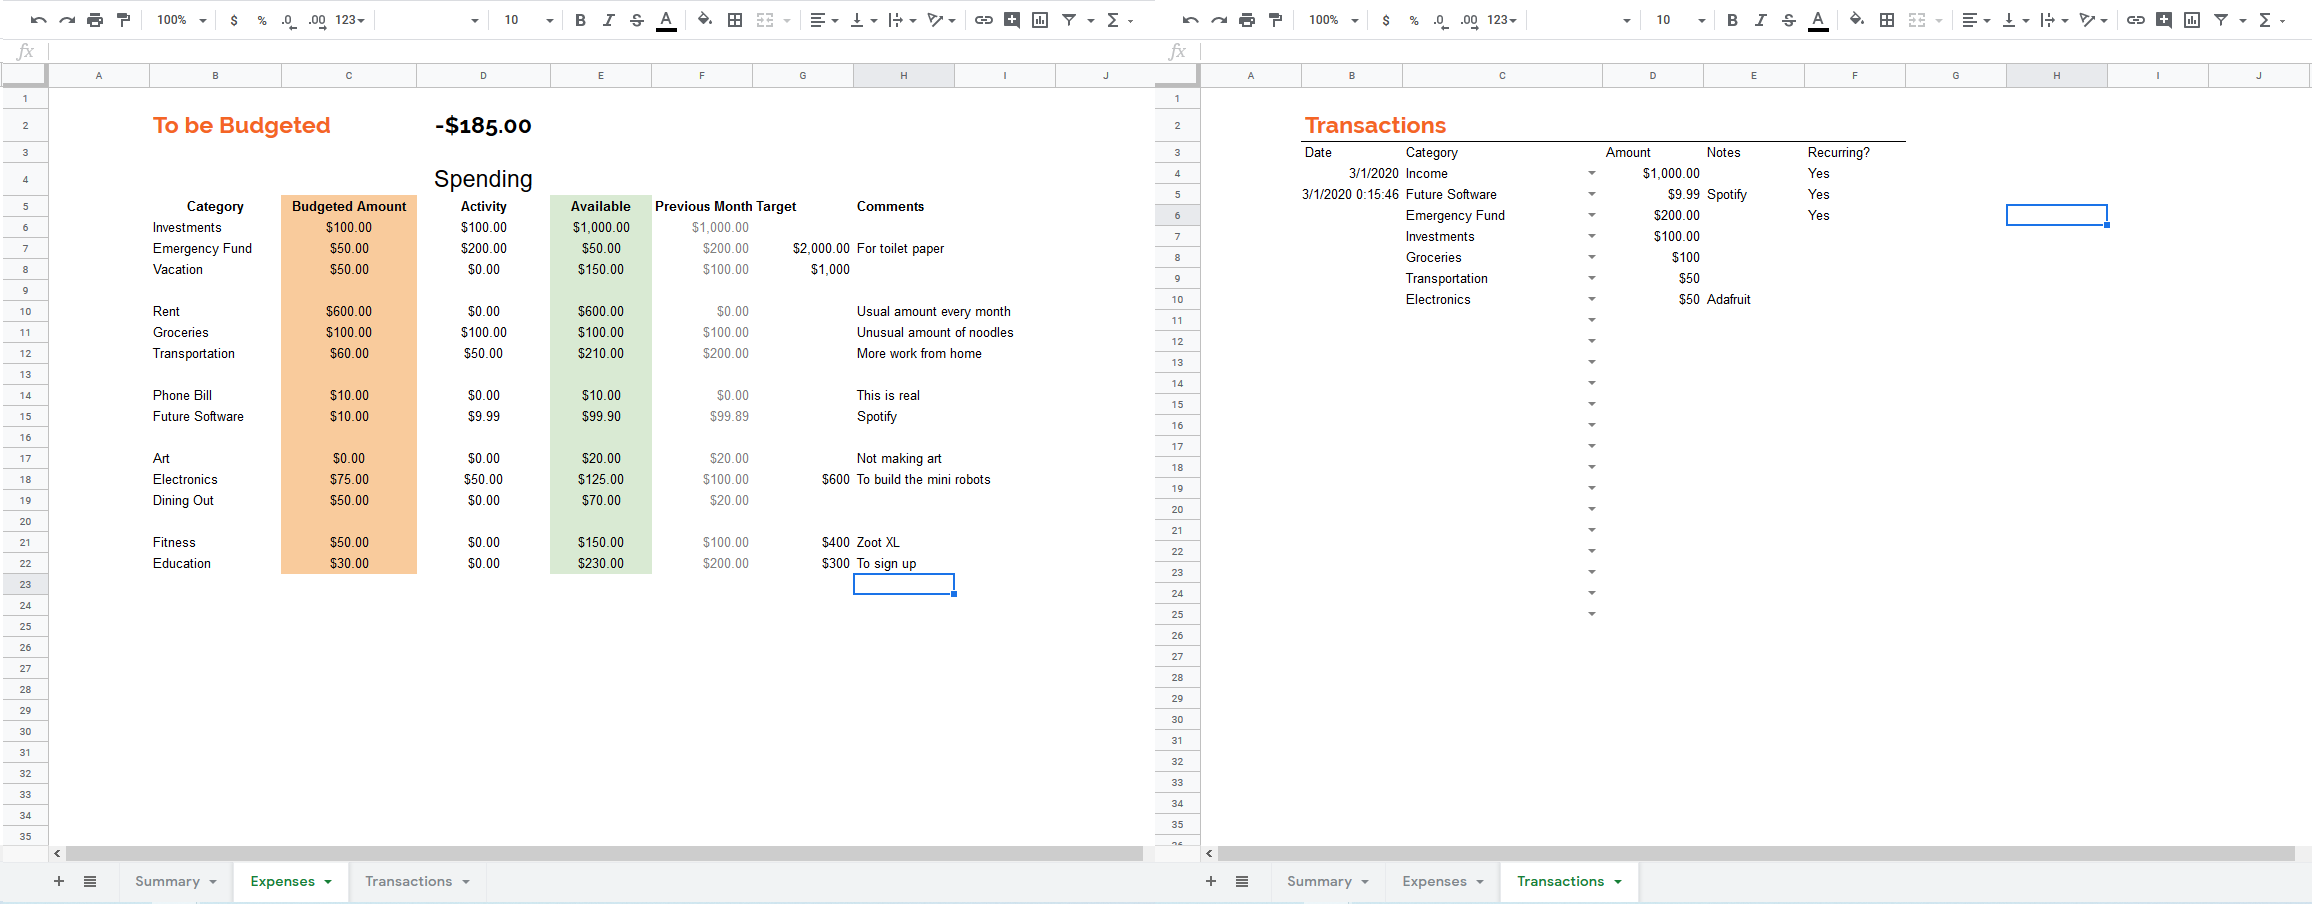
Here are a few screenshots of a simulated budget in action.
Google Apps Script
Google Apps Script uses Javascript, and it has been really easy to build an automated system to update the spreadsheet.
Automatically creating spreadsheets monthly
Manual work is required to create the first spreadsheet. I took awhile to set up the tables and columns of categories and tweaked the budget until I am happy. As you can see, a lot of my inspiration stems from YNAB.
Under Tools > Script Editor, you can start a Google Apps Script project that is tied specifically to the sheet you are editing.
Since budgeting carries over the total from month to month, the first thing I did was to create a newMonth() function that generates a new spreadsheet every month:
function newMonth() {
  var now = new Date();
  var sheetName = formatDate(); // this month's spreadsheet
  var monthNames = ["Jan","Feb","Mar","Apr","May","Jun","Jul","Aug","Sep","Oct","Nov","Dec"];
  var monthNumber = Utilities.formatDate(new Date(), 'GMT+12:00', "M");
  var yearNumber = Utilities.formatDate(new Date(), 'GMT+12:00', "yyyy");
 }
Why go through the whole process of creating a spreadsheet every month when software can do it for you automatically with all the relevant details?
The formatDate() was just a function I wrote to create a name for the budget spreadsheet. I wanted something that was easy to remember, so it wound up being BAB-[Month]-[Year]. BAB stands for Build-A-Budget.
function formatDate() {
  var monthNames = ["Jan","Feb","Mar","Apr","May","Jun","Jul","Aug","Sep","Oct","Nov","Dec"];
  var monthNumber = Utilities.formatDate(new Date(), 'GMT+12:00', "M");
  var yearNumber = Utilities.formatDate(new Date(), 'GMT+12:00', "yyyy");
  return 'BAB'+'-'+monthNames[monthNumber-1]+'-'+yearNumber;
}
Back in newMonth(), notice when I grabbed the previous month's spreadsheet by name, I refer to the previous month as monthNumber - 2. This is because the Utility function returns the current month of a value from 1 - 12, however, in an array, numbers start from position zero. Therefore, -1 for being the previous month, and -1 for zero-basing the value returned from the Date utility:
if ((monthNumber-2)<0){
    var ss = getSpreadsheetByName('BAB'+'-'+'Dec'+'-'+yearNumber-1); // if Jan, then we use last month's budget.
  }
  else{
    var ss = getSpreadsheetByName('BAB'+'-'+monthNames[monthNumber-2]+'-'+yearNumber);
  }
Now that I have the previous month's sheet stored in ss, I want to create a new sheet.
var cs = getSpreadsheetByName(sheetName);
  if (cs==null){
    DriveApp.getFileById(ss.getId()).makeCopy(sheetName); // if we don't have the spreadsheet create it.
  }
  else { // we have the sheet, delete it.
    var files = DriveApp.getFilesByName(sheetName);
    while (files.hasNext()) {
      files.next().setTrashed(true);
   }
   DriveApp.getFileById(ss.getId()).makeCopy(sheetName); // if we don't have the spreadsheet create it.
  }

cs = getSpreadsheetByName(sheetName); // get the new spreadsheet
Now because I debug this a lot, I have some additional helper logic to make sure that the new sheet I am creating is the only one in my Drive. It is a little roundabout because you have to getId() of the file instead of the name to make a copy, but that is to ensure that the correct file is copied because you can have multiple files of the same name in Google Drive.
Now that I've created a copy of the spreadsheet of the previous month, let's format it!
  // start formatting the new sheet

  // Format the Expense Sheet

  var sourcesheet = cs.getSheetByName('Expense');
  var numRows = sourcesheet.getLastRow() - 6 + 1;
  sourcesheet.getRange('E6:E').copyTo(sourcesheet.getRange('F6:F'),{contentsOnly: true}); // shift last month's Avaliable amount to the prev month's column
  sourcesheet.getRange('F6:F').setFontColor('grey');
  sourcesheet.getRange(6,3,numRows).clear({contentsOnly: true}); // clear the budgeted range.

  // Format the Transactions Sheet

  var TxSheet = cs.getSheetByName('Transactions'); // clear the transaction sheet
  numRows = TxSheet.getLastRow() - 4 + 1;// get the total number of rows
  recurring = 0 // count the number of recurring transactions
  for (var i = 3;i<numRows;i++){
    if (TxSheet.getRange(i,6).getValue()=="Yes"){ // recurring transaction, skip this row.
      recurring = recurring+1;
      TxSheet.getRange(i,2).setValue(now) // set the Date of the recurring transaction to today's date.
    }
  }

  for (var i = 2;i<6;i++){
    TxSheet.getRange(4 + recurring,i,numRows).clear({contentsOnly: true}); // clear the budgeted range.
  }
The formatting is really specific to how you have set up your sheet. What I have done is to shift the total from the previous month into the 'previous' month's column, effectively overriding it and formatted it. I also cleared the budgeted range.
For the transactions sheet, all transactions are cleared except those that are marked as recurring transactions.
Updating sheets from previous months
Now I don't always manage to capture my finances within the same month. I decided against dynamically linking each spreadsheet to prevent a potentially nasty domino chain. However, if I key in the previous month's transactions, I still want it to be reflected this month, even if the file has already been created. There are no links between each file so I created a separate function:
function updatePreviousMonth(){
  var now = new Date();
  var currSheetName = SpreadsheetApp.getActiveSpreadsheet().getName(); //BAB-Mar-2020
  monthName = currSheetName.substring(4,7);
  yearNumber = currSheetName.substring(8);

  var monthNames = ["Jan","Feb","Mar","Apr","May","Jun","Jul","Aug","Sep","Oct","Nov","Dec"];
  var monthNumber = monthNames.indexOf(monthName);
  }
First we set up the necessary initial values. Remember how I decided to name my files? It turns out that it is really useful for extracting the date without any of that dancing with the Utility class.
if ((monthNumber-1)<0){
    var prevss = getSpreadsheetByName('BAB'+'-'+'Dec'+'-'+yearNumber-1); // if Jan, then we use last month's budget.
  }
  else{
    var prevss = getSpreadsheetByName('BAB'+'-'+monthNames[monthNumber-1]+'-'+yearNumber);
  }
  var cs = getSpreadsheetByName(currSheetName); // current sheet
Again here we deal with possible rollover to the previous year.
  // start formatting the sheet

  var sourcesheet = prevss.getSheetByName('Expense');
  var currentsheet = cs.getSheetByName('Expense');
  var numRows = sourcesheet.getLastRow() - 6 + 1;
  var source_range = sourcesheet.getRange('E6:E');
  var target_range = currentsheet.getRange('F6:F');
  var values = source_range.getValues();
  target_range = target_range.setValues(values)
Finally we grab the final value of the Expense sheet of the previous month's Spreadsheet, calculated from all the transactions in the previous month and paste it into our new month's starting amount for each category, thereby updating this month's available funds from last month's total.
Creating Triggers
In order to get the newMonth() function to run at the start of every month, a trigger must be created. This can easily be done by creating a file name triggers.gs in the same project, and creating a Trigger object:
function createTimeDrivenTriggers() {
  // Trigger every 1st of month.
  ScriptApp.newTrigger('newMonth')
      .timeBased()
      .onMonthDay(1)
      .create();
}
For more details, please see: https://developers.google.com/apps-script/guides/triggers/installable
Custom menus
Having a custom menu helps in filling out a form, especially if you are trying to do it on mobile. The nice thing about Google Sheets is that sheets can be edited directly in your phone with an app. However they become a little too finicky because of how small the cells are and its easy to accidentally delete or shift a group of cells.
So I added a custom menu to the spreadsheet when it is opened. Among its options, the menu allows you to key in a new transaction and this is done in a very civilized manner with a properly formatted HTML page.
To make the code neater, I extracted out the functions that create the menu into its own file ui.gs.
function onOpen() {
  var spreadsheet = SpreadsheetApp.getActive();
  var menuItems = [
    {name: 'Add new item', functionName: 'addNewItem'},
    {name: 'Rebalance', functionName: 'rebalance'}, //take leftovers and fill up.
    {name: 'Update from Previous Month', functionName: 'updatePreviousMonth'}
  ];
  spreadsheet.addMenu('Add Transactions', menuItems);
}

function addNewItem(){
  //var sheet = SpreadsheetApp.getActiveSheet();
  var html = HtmlService.createHtmlOutputFromFile('Page')
      .setWidth(400)
      .setHeight(300);
  SpreadsheetApp.getUi() // Or DocumentApp or SlidesApp or FormApp.
      .showModalDialog(html, 'Add New Transaction');
}
A HTML document created as Page.html is created to display all the options as well as to handle the layout when addNewItem()is called.
<!DOCTYPE html>
<html>
  <head>
    <base target="_top">
   <link rel="stylesheet" href="https://ssl.gstatic.com/docs/script/css/add-ons1.css">
  </head>
  <body>
    Amount:
    <input name="transaction">

    <div class="block">
     <div class="dropdown">
     <!--<button onclick="loadDropdown()" class="dropbtn">Dropdown</button>-->
        <div id="myDropdown" class="dropdown-content"></div>
     </div>
     </div>

     <div class="form-group">
     <label for="notes">Notes</label>
     <textarea id="notes"  name = "notes" rows="3"></textarea>
     </div>

    <input type="submit" value="Submit" class="action" onclick="form_data()" >
    <input type="button" value="Close" onclick="google.script.host.close()" >


    <script src="//ajax.googleapis.com/ajax/libs/jquery/1.9.1/jquery.min.js">
    </script>
    <script>
      function form_data(){
        var values = {
          "amount":$("input[name=transaction]").val(),
          "type":$("#myDropdown :selected").text(),
          "notes":$("textarea[name=notes]").val()
        };
        google.script.run.withSuccessHandler(closeIt).process_form_data(values);
      };
      function closeIt(){
        google.script.host.close()
      };

      function loadDropdown() {
          google.script.run.withSuccessHandler(function(ar) {
              let select = document.createElement("select");
              select.id = "select1";
              select.setAttribute("onchange", "selected()");
              document.getElementById("myDropdown").appendChild(select);
              ar.forEach(function(e, i) {
                  let option = document.createElement("option");
                  option.value = i;
                  option.text = e;
                  document.getElementById("select1").appendChild(option);
              });
          }).getValuesFromSpreadsheet();
      };
      window.onload = loadDropdown
    </script>
  </body>
</html>
The fun thing about this page is that it also automatically creates a dropdown list of the categories that you already defined in the sheet . This function is defined under Code.gs and the result is passed into withSuccessHandler.
function getValuesFromSpreadsheet() {
  var sheet = SpreadsheetApp.getActiveSpreadsheet().getSheetByName("Expense");
  var range_input = sheet.getRange(6, 2, sheet.getLastRow(), 1).getValues(); // Retrieve values and send to Javascript
  return result = [i for each (i in range_input)if (isNaN(i))];
}
The data from the HTML is passed to the process_form_data function, which simply puts it into the Transactions sheet after appending the time the form was filled in.
function process_form_data(values){
  //Display the values submitted from the dialog box in the Logger.
  Logger.log(values.type);
  var now = new Date(); // This is today's date
  var sheet = SpreadsheetApp.getActiveSpreadsheet().getSheetByName('Transactions');
  var lRow = sheet.getLastRow();
  sheet.appendRow(['',now,values.type,values.amount,values.notes]);
  sheet.getRange("D:D").setNumberFormat("$ 00.00");
};
Helper Functions
function getSpreadsheetByName(filename) {
  var FileIterator = DriveApp.getFilesByName(filename);
  while (FileIterator.hasNext())
  {
    var file = FileIterator.next();
    if (file.getName() == filename)
    {
      return SpreadsheetApp.open(file);
      //var fileID = file.getId();
    }
  }
  return null;
}
This function iterates through your Google Drive and returns the first spreadsheet object that matches the name given to it.
function clearColumn(colNumber, startRow){
  //colNumber is the numeric value of the colum
  //startRow is the number of the starting row

  var sheet = SpreadsheetApp.getActiveSheet();
  var numRows = sheet.getLastRow() - startRow + 1; // The number of row to clear
  var range = sheet.getRange(startRow, colNumber, numRows);
  range.clear();

}
This function just clears the column from a certain row. Useful if you want to retain titles.
function rebalance(){
  var sheet = SpreadsheetApp.getActiveSpreadsheet().getSheetByName("Expense"); // get the sheet
  var numRows = sheet.getLastRow() - 0  + 2;
  while(sheet.getRange(2,4).getValue() > 0 ){
    for(var i = 6;i<sheet.getLastRow();i++){
      var currVal = sheet.getRange(i,5).getValue(); // value of the available amount
      var excess = sheet.getRange(2,4).getValue(); // value of how much we have to budget
      if (currVal < 0 && excess+currVal>0){ // if it is negative and we can make it positive
        var budgeted = sheet.getRange(i,3).getValue();
        budgeted = budgeted-currVal;
        sheet.getRange(i,3).setValue(budgeted); // add value
        //sheet.getRange(2,4).setValue(excess+currVal); // take away value of the amount we have to budget
      }

    }
    break;
  }
}
This function automatically uses the remaining budget and balances every transaction that is in the red.
Conclusion
After all that work we have set up an automated process to keep track of our budget from month to month.
It does not offer a direct integration with your credit card or transactions, but you can definitely write a program that digests your statement and spits the information out in an easy to process csv file format.
I can also manually update the sheet by using the Sheets App on my phone. The custom menu makes this easy to do without having to find and tap on each tiny cell.
It is definitely not as conveninent as having an app do everything for you, but I find that I can get most of what I want out of my setup, and it came with a good amount of learning experience.