The Digispark Temperature Sensor

The Digispark is a low-cost Attiny85 module that breaks out all pins in a breadboard friendly format and combines it with a USB interface to allow programming with the Arduino IDE. Because it is open source, others have found methods to reduce the cost of production of this board and it can be had for as low as $1 a board.
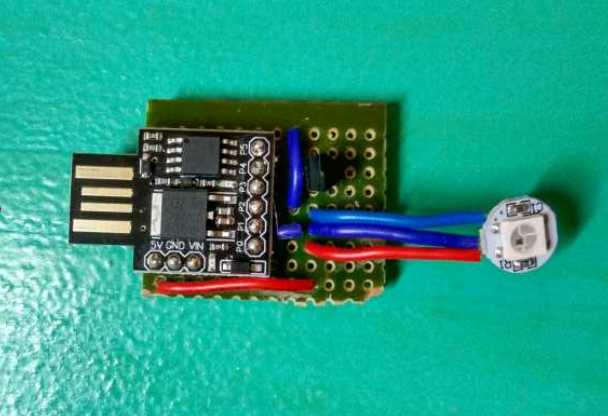
 Figure 1. Completed Digispark Temperature Sensor
This particular project allows you to have a temperature sensor that shows you the current ambient temperature in different gradients of light. It is highly portable because it can be plugged in directly to a powerbank's USB port. You can mount it on a breadboard or a prototyping board.
A diode has a known relationship with temperature. This relationship can be converted into a linear relationship. By amplifying the tiny amounts of current flowing through the diode, this can be output as a signal that directly correlates with the ambient temperature. For the LM35, this is 10mA/°C. However, the problem with this sensor is that it varies by 2°C, which means that we have to do some post processing on the data to get a series of smooth readings.
While a higher sensitivity temperature sensor may be used, I think it is instructive to learn how to minimise noise of a sensor. One challenge is to write the sketch yourself. Clues are that you'll have to use Adafruit's Neopixel library to run the PCB and some sort of average to filter out the noise.
Materials Required
- Digispark USB board
- Adafruit Neopixel Mini PCB
- LM35 Temperature Sensor
- AWG 22 Wires
Procedure
-
Set up your 5V power and ground lines. You can either plug it into a breadboard, in which case you'll have to bend the V-in pin or you can position it on a prototyping board. Because the way the pins are laid out, it is a bit difficult to get to the power and ground lines. My solution was to run the power and ground lines on opposite sides of the board.
-
Connect the data pin of the Neopixel PCB to P1 and the LM35's data pin to P2. Connect them to both power and ground.
CAUTION: Make sure that your pins on the temperature sensor are not inverted. Because the LM35 relies on a diode in the reverse direction to detect temperature, connecting it wrongly can cause it to overheat.
- Upload the sketch and you are done!
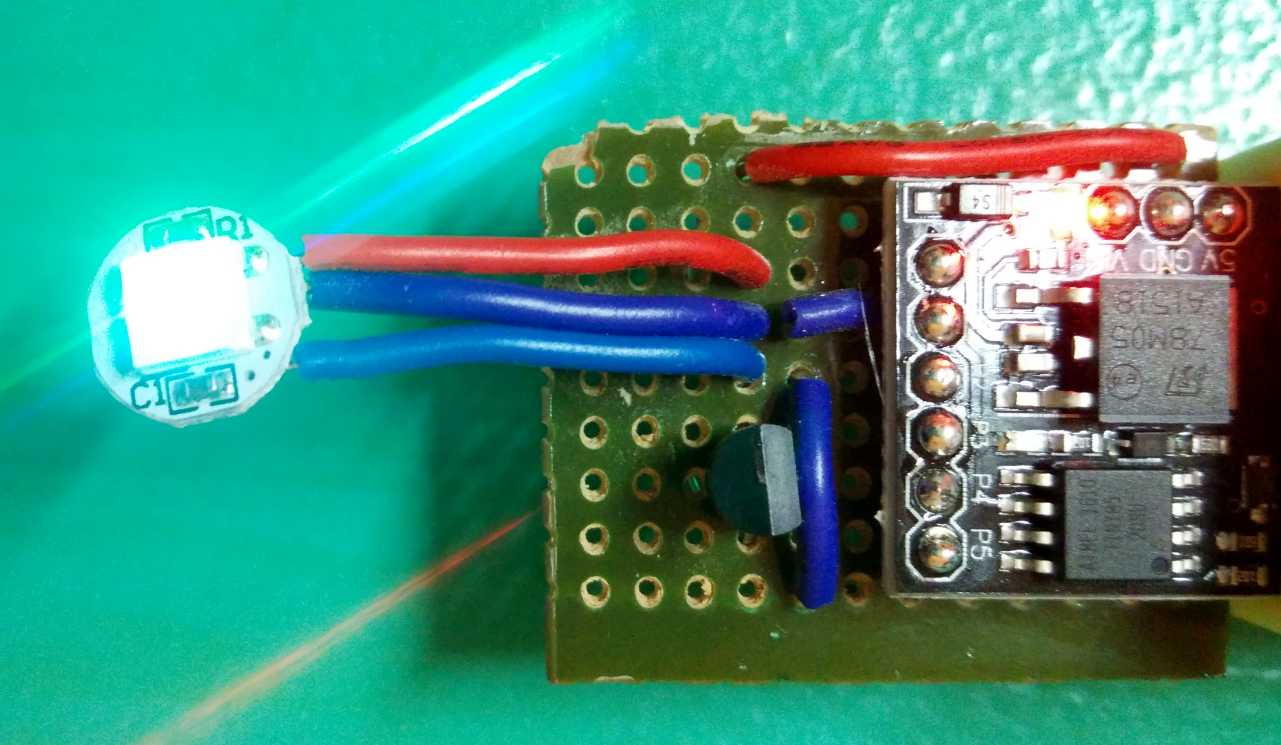 Figure 2. Digispark Temperature Sensor
Sketch
#include "RunningAverage.h"
#include <Adafruit_NeoPixel.h>
#define PIN 1
#define NUM_PIXELS 1

RunningAverage tempRA(30);

Adafruit_NeoPixel pixels = Adafruit_NeoPixel(NUM_PIXELS, PIN, NEO_GRB |         NEO_KHZ800);
float temp;
int tempPin = 1; // analog input pin
int sampleTime = 1000; // 1 second dafault
int samples = 0;

void setup()
{
  analogReference(INTERNAL);
  pixels.begin();
  tempRA.clear();
}
void loop()
{
  if (samples == 30) {
    int store = tempRA.getAverage();
    samples = 0;
    tempRA.clear();
  }
  while (samples < 6) {
    temp = analogRead(tempPin);
    temp = temp * 0.48828125;
    tempRA.addValue(temp);
    samples++;
    delay(sampleTime);
  }

  temp = analogRead(tempPin);
  temp = temp * 0.48828125;
  tempRA.addValue(temp);
  samples++;


  if (tempRA.getAverage() > 24 and tempRA.getAverage() < 26) {
    pixels.setPixelColor(0, pixels.Color(0, 50, 0));
   pixels.show();
  }
  else if (tempRA.getAverage() < 24 ) {
    float i = 24 - tempRA.getAverage();
    int i = i * 30;
    if (i > 50) {
      pixels.setPixelColor(0, pixels.Color(0, 0, i));
    }
    else {
      pixels.setPixelColor(0, pixels.Color(0, 50 - i, i));
    }

    pixels.show();
  }
  else if (tempRA.getAverage() > 26) {
    float i = tempRA.getAverage() - 26;
    i = i * 30;
    if (i > 50) {
      pixels.setPixelColor(0, pixels.Color(i, 0, 0));
    }
    else {
      pixels.setPixelColor(0, pixels.Color(i, 50 - i, 0));
    }

    pixels.show();
  }
  else {
    pixels.setPixelColor(0, pixels.Color(50, 0, 50));
    pixels.show();
  }
  delay(sampleTime);

}